તમારું પ્રથમ સબ્સ્ક્રિપ્શન પ્રોડક્ટ બનાવવું (v2)
મહત્વની નોંધ: આ લેખ ફક્ત Ultimate Multisite version 2.x વપરાશકર્તાઓ માટે છે. જો તમે version 1.x વાપરી રહ્યા છો, _આ લેખ જુઓ_.
તમારું નેટવર્ક ચલાવવાનું શરૂ કરવા અને સંભવિત વપરાશકર્તાઓને તમારી સેવાઓ વેચવાનું શરૂ કરવા માટે, તમારી પાસે વિવિધ સબ્સ્ક્રિપ્શન વિકલ્પો હોવા જરૂરી છે. તમે આ પ્રોડક્ટ્સ કેવી રીતે બનાવો છો? તમે કયા પ્રકારની પ્રોડક્ટ્સ ઓફર કરી શકો છો? આ લેખમાં, અમે પ્રોડક્ટ્સ વિશે તમને જે બધું જાણવાની જરૂર છે તે આવરી લઈશું.
પ્રોડક્ટ પ્રકાર
Ultimate Multisite સાથે તમે તમારા ગ્રાહકોને બે પ્રકારની પ્રોડક્ટ્સ ઓફર કરી શકો છો: plans અને add-ons (Order Bump). Add-ons ને બે પ્રકારમાં વિભાજિત કરી શકાય છે: packages અને services. આપણે તેમના તફાવતો અને વિશેષતાઓ આગળ જોઈશું.
-
Plans : Ultimate Multisite ની મૂળભૂત પ્રોડક્ટ. તમારા ગ્રાહક પાસે ફક્ત ત્યારે જ મેમ્બરશિપ હોઈ શકે જ્યારે તે plan સાથે જોડાયેલી હોય. plan તમારા ગ્રાહકોને એક અથવા વધુ sites પ્રદાન કરે છે (તે તમારા plan ના configurations પર આધાર રાખે છે) જે મર્યાદાઓ તમે તમારા product editing page પર સેટ કરો છો તે સાથે.
-
Packages : add-ons જે સીધી Ultimate Multisite plans ની કાર્યક્ષમતાઓને અસર કરે છે. તેઓ મર્યાદાઓ બદલે છે અથવા તમારા ગ્રાહકે ખરીદેલ મૂળ plan માં નવા resources, plugins અથવા themes ઉમેરે છે. ઉદાહરણ તરીકે, એક basic plan દર મહિને 1,000 visits ની મંજૂરી આપી શકે છે અને તમે એક package ઉપલબ્ધ કરાવી શકો છો જે આ સંખ્યાને 10,000 સુધી વધારે છે.
-
Services: add-ons જે Ultimate Multisite ની કાર્યક્ષમતાઓને બદલતા નથી. તેઓ એવા કાર્યો છે જે તમે તમારા ગ્રાહક માટે તેમણે ખરીદેલ plan ઉપરાંત કરશો. ઉદાહરણ તરીકે, તમારો ગ્રાહક એક plan ખરીદી શકે છે જે એક જ site ની મંજૂરી આપે છે અને એક વધારાની service માટે પણ ચૂકવણી કરે છે જે આ site ની design કરશે.
પ્રોડક્ટ્સનું સંચાલન
ઘણા લોકો માટે Ultimate Multisite માં Products tab (Ultimate Multisite > Products) ને પરંપરાગત hosting environment માં plans સાથે સરખાવી શકાય છે.
Ultimate Multisite માં Products tab ચોક્કસ product અથવા service પર લાગુ થતી રચના અને મર્યાદાઓ વ્યાખ્યાયિત કરે છે. આવી રચનાઓ product અથવા service description, price, taxes અને permissions સુધી વિસ્તરે છે.
આ વિભાગ Ultimate Multisite ના આ આવશ્યક પાયાની તમારી સમજણને માર્ગદર્શન આપશે.
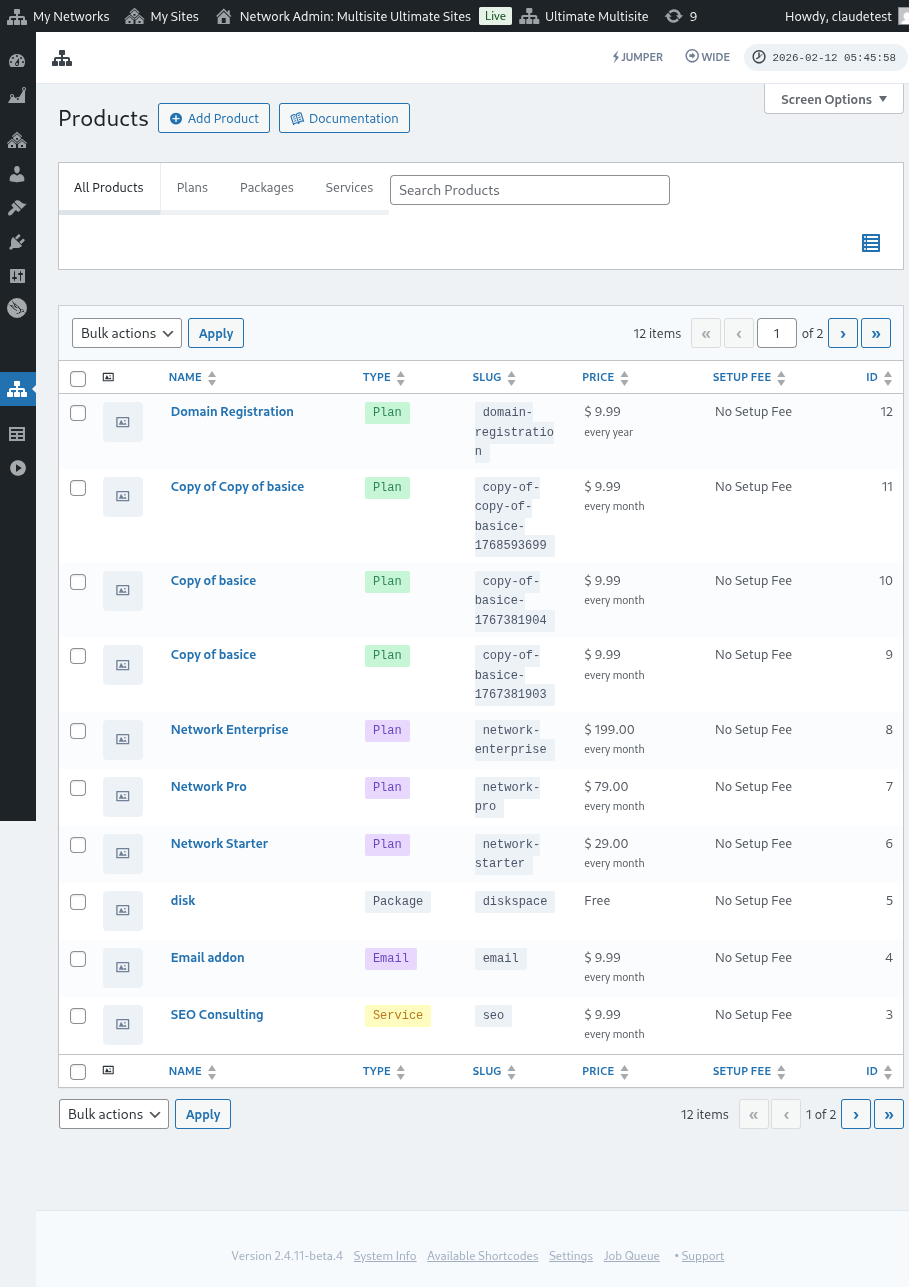
પ્રોડક્ટ્સ ઉમેરવી
plan, package, અથવા service હોય, નવી item વ્યાખ્યાયિત કરવાનો entry point Ultimate Multisite > Products > Add Product દ્વારા છે.
![]()
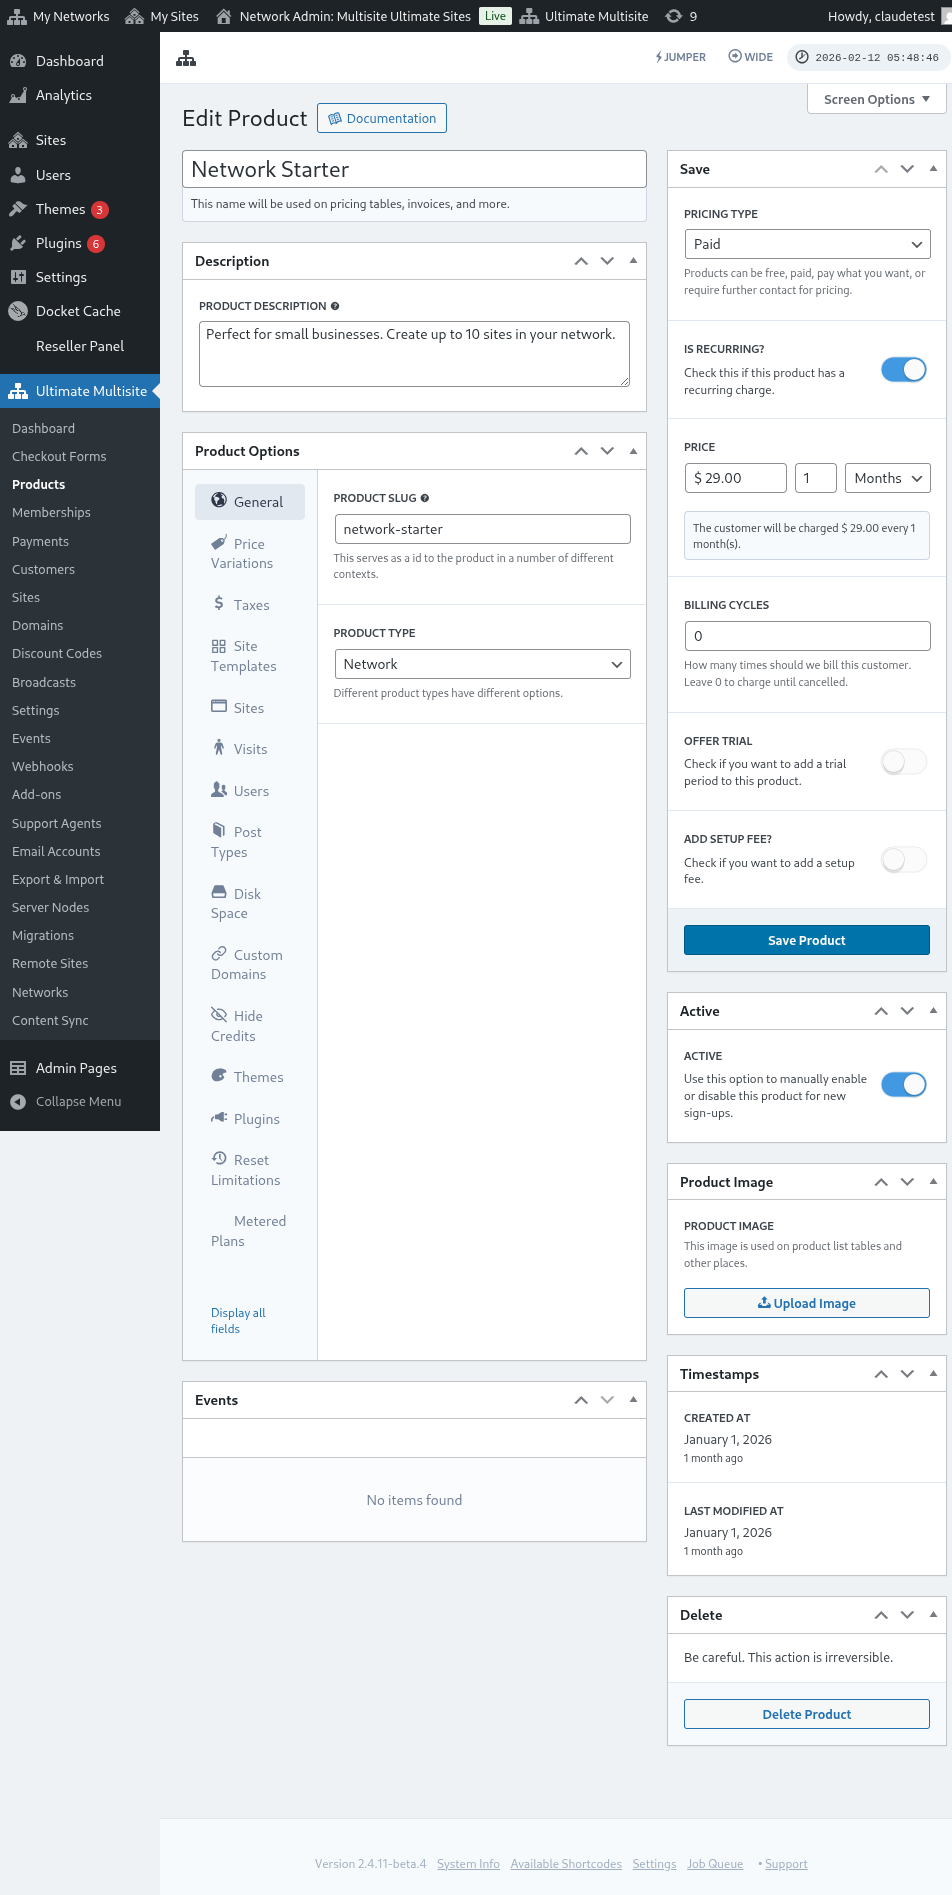
interface માં બે મુખ્ય વિભાગો છે. ડાબી બાજુએ ઘણા tabs છે જે product ની વ્યાખ્યામાં મદદ કરે છે અને જમણી બાજુએ product ની base price, તેની active state અને product image વ્યાખ્યાયિત કરવા માટે થોડા વિભાગો છે.
વર્ણન
base product માહિતી product name અને description પ્રદાન કરીને વ્યાખ્યાયિત કરી શકાય છે. આ identifiers જ્યાં પણ product માહિતી જરૂરી હોય ત્યાં પ્રદર્શિત થાય છે જેમ કે plan અને pricing selection, invoices, upgrades, અને આવા બીજા.

Pricing પ્રકાર
interface ની જમણી બાજુએ, base pricing વ્યાખ્યાયિત કરી શકાય છે.
Ultimate Multisite ત્રણ અલગ-અલગ pricing પ્રકારોને સપોર્ટ કરે છે. paid વિકલ્પ network administrator ને product ની price અને billing frequency વિશે માહિતી માટે પૂછે છે.
Pricing
price component base product price અને billing interval વ્યાખ્યાયિત કરે છે.
આમ $29.99 ની ઉદાહરણ price 1 month ની setting સાથે દર મહિને $29.99 bill કરશે. એ જ રીતે, $89.97 ની price 3 months ની setting સાથે દર quarter માં તે રકમ bill કરશે.
Billing Cycles
billing cycles વિભાગ ઉપરોક્ત billing interval ની frequency સ્પષ્ટ કરે છે અને સામાન્ય રીતે contracts અથવા fixed terms ના સંદર્ભમાં સમજાય છે.
ઉદાહરણ તરીકે, $29.99 ની product price 1 month ના interval અને 12 billing cycles સાથે product માટે આગામી 12 મહિનામાં દર મહિને $29.99 bill કરશે. બીજા શબ્દોમાં, આવી setting 12 મહિના માટે દર મહિને $29.99 ની fixed-price term સ્થાપિત કરશે અને પછી billing બંધ કરશે.
Trial Period
offer trial toggle સક્ષમ કરવાથી network administrator ને product માટે trial period વ્યાખ્યાયિત કરવાની મંજૂરી મળે છે.
trial period દરમિયાન, ગ્રાહકો product નો ઉપયોગ કરવા માટે મુક્ત છે અને trial period સમાપ્ત થાય ત્યાં સુધી તેમને bill કરવામાં આવશે નહીં.
Setup Fee
તમે તમારા plan પર setup fee પણ લાગુ કરી શકો છો.
આનો અર્થ એ છે કે તમારો ગ્રાહક પ્રથમ charge પર વધારાની રકમ ચૂકવશે (price plan ઉપરાંત) જે તમે આ વિભાગમાં વ્યાખ્યાયિત કરેલી fee ને અનુરૂપ છે.
Active
active toggle અસરકારક રીતે વ્યાખ્યાયિત કરે છે કે product નવા sign-ups માટે ગ્રાહકોને ઉપલબ્ધ છે કે નહીં.

જો આ plan પર હાલના ગ્રાહકો છે, તો toggle ને તેની disabled state પર સેટ કરવાથી અસરકારક રીતે plan ને grandfathers કરે છે અને તેને ભવિષ્યના sign-ups માંથી દૂર કરે છે. plan પરના હાલના ગ્રાહકોને bill કરવાનું ચાલુ રહેશે જ્યાં સુધી તેઓ નવા plan માં transition ન થાય અથવા plan માંથી દૂર ન થાય.
Product Image
Upload Image button network administrator ને product image પસંદ કરવા અથવા upload કરવા માટે media library નો ઉપયોગ કરવાની મંજૂરી આપે છે.

Delete
Delete Product button product ને system માંથી delete કરે છે. તે product publish થયા પછી દેખાય છે.

અન્ય deletions થી વિપરીત, product કોઈ trash state માં મૂકવામાં આવતી નથી. આમ એકવાર delete થયા પછી action ઉલટાવી શકાતી નથી.
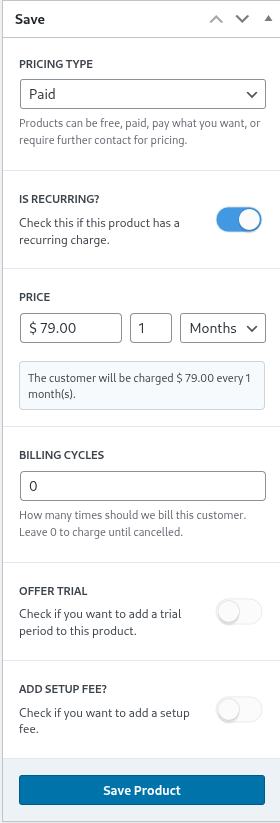
Product Options
એકવાર base-level product માહિતી વ્યાખ્યાયિત થઈ જાય, product options network administrator ને product ના ચોક્કસ attributes વધુ વ્યાખ્યાયિત કરવામાં મદદ કરે છે.
General
General tab product ના general attributes વ્યાખ્યાયિત કરે છે જે અન્ય કોઈ product-specific tabs પર લાગુ થતા નથી.
સ્વ-સ્પષ્ટીકરણાત્મક product slug તે slug વ્યાખ્યાયિત કરે છે જેની સાથે product URLs અને Ultimate Multisite ના અન્ય વિસ્તારોમાં ઓળખાય છે.
Ultimate Multisite ઘણા product types ને સપોર્ટ કરે છે જેમ કે Plan, Package, અને Service. Product Options tabs સ્પષ્ટ કરેલ product type ના આધારે dynamically adjusted થાય છે.
Customer Role તે role સ્પષ્ટ કરે છે જે ગ્રાહકને site બનાવવામાં આવે ત્યારે assign થાય છે. સામાન્ય રીતે મોટાભાગના network administrators માટે, આ Ultimate Multisite default અથવા Administrator હશે. Ultimate Multisite default role Ultimate Multisite > Settings > Login & Registration માં સેટ કરી શકાય છે.
Up & Downgrades
આ tab ગ્રાહકના ચોક્કસ tier માં ઉપલબ્ધ upgrade અને downgrade paths સ્પષ્ટ કરે છે.
આ concept સમજવા માટે એક ઉદાહરણ વિચારો જ્યાં એક niche Ultimate Multisite installation તેના ગ્રાહકોને learning management solutions પ્રદાન કરે છે. આ પ્રાપ્ત કરવા માટે ત્રણ plans (Basic, Plus, અને Premium) વ્યાખ્યાયિત કરવામાં આવ્યા છે અને દરેક plan માટે ચોક્કસ plugins activated છે (plugins activate કરવા માટેની સૂચનાઓ માટે આ વિભાગમાં પછી જુઓ).
જો Ultimate Multisite installation business websites અથવા eCommerce websites ને પણ service કરે છે, તો તે plans ને અલગ plugins install અને activate કરવાની જરૂર પડી શકે છે.
આ હદ સુધી, eLearning ગ્રાહકોને eCommerce plans માં transition કરવાની મંજૂરી આપવી અનિચ્છનીય અને સમસ્યારૂપ હશે કારણ કે આ plans, pricing, અને limitations યોગ્ય fit ન હોઈ શકે.
આમ ગ્રાહકના path ને restrict કરવા અને incidents અટકાવવા માટે network administrator plan group વ્યાખ્યાયિત કરી શકે છે અને તે group માં ગ્રાહક transition કરી શકે તેવા plans સ્પષ્ટ કરી શકે છે.

plan group વ્યાખ્યાયિત કરવા માટે plan group list માં compatible plans સ્પષ્ટ કરો. product order નક્કી કરે છે કે plans lowest થી highest સુધી કેવી રીતે order અને display થાય છે.
Ultimate Multisite માં order bump feature પણ સામેલ છે જ્યાં યોગ્ય add-on products અને services plans માં ઉમેરી શકાય છે. આ ગ્રાહકને checkout પર અથવા upgrade દરમિયાન plans માં ઉમેરી શકાય તેવી additional items તરીકે offer કરવામાં આવે છે.
Price Variations
Price variations network administrator ને duration ��ના આધારે alternate pricing tiers સ્પષ્ટ કરવાની મંજૂરી આપે છે. આ setting 3 months, 6 months, અથવા annual pricing tiers સ્થાપિત કરવાનું શક્ય બનાવે છે અથવા use case દ્વારા નિર્ધારિત કોઈપણ અન્ય duration અને frequency.
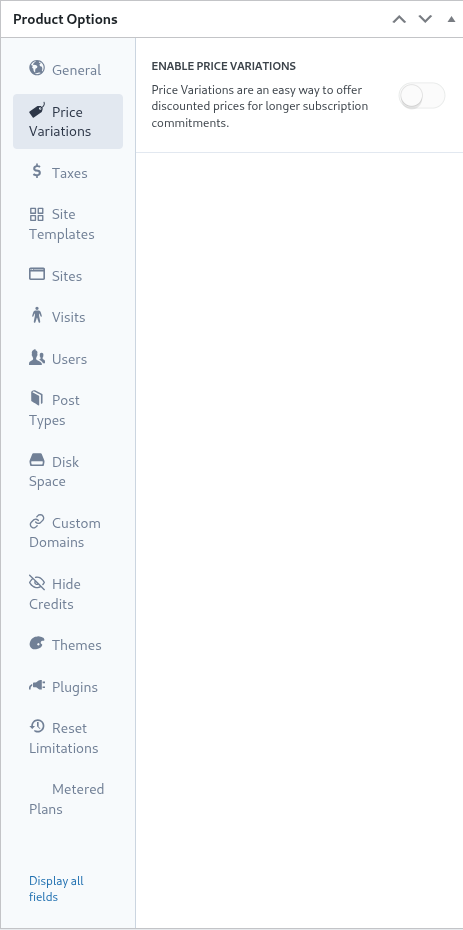
price variations સ્થાપિત કરવા માટે, enable price variations toggle ને active પર સેટ કરો અને Add new Price Variation button પર click કરો.
variation enter કરવા માટે, variation ની duration, period, અને price સેટ કરો. button ફરીથી click કરીને additional variations enter કરી શકાય છે.
Taxes
Taxes tab Ultimate Multisite > Settings > Taxes માં સ્પષ્ટ કરેલ tax settings અને વધુ ખાસ કરીને વ્યાખ્યાયિત tax rates સાથે align થાય છે. taxes enable કરવા અને applicable tax rates વ્યાખ્યાયિત કરવા માટે કૃપા કરીને Ultimate Multisite: Settings પર documentation જુઓ
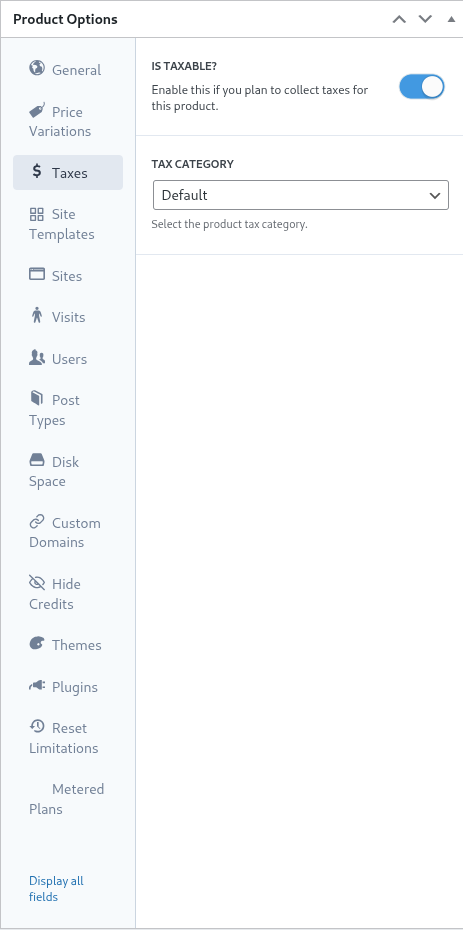
અગાઉના ઉદાહરણમાં, અમે California (United States of America) માં ગ્રાહકો માટે applicable 7.25% નો local tax rate વ્યાખ્યાયિત કર્યો.
એકવાર tax rate Ultimate Multisite > Settings > Manage Tax Rates માં વ્યાખ્યાયિત થઈ જાય, તે product level પર selectable છે.
product taxable item છે તે indicate કરવા માટે, Is Taxable toggle ને active પર સેટ કરો અને Tax Category dropdown માંથી applicable tax rate પસંદ કરો.
Site Templates
મૂળભૂત રીતે, site templates સંપૂર્ણ WordPress websites છે જે ગ્રાહકની subscription ની શરૂઆતમાં તેમની site પર clone થાય છે.

network administrator template site ને activated અને configured themes, plugins, અને content સાથે regular WordPress site તરીકે બનાવે અને configure કરે છે. template site ગ્રાહકને શબ્દશઃ clone થાય છે.
આ tab network administrator ને નવી subscription પર site templates ના behavior સ્પષ્ટ કરવાની મંજૂરી આપે છે. site templates નો ઉપયોગ કરવા માટે, allow site templates toggle ને તેની active state પર સેટ કરો.
site template selection mode subscription process દરમિયાન site templates ના behavior વ્યાખ્યાયિત કરે છે.
Default setting checkout form માં steps follow કરે છે. જો network administrator એ checkout process માં template selection step વ્યાખ્યાયિત કરી છે અને step templates સાથે વ્યાખ્યાયિત કરવામાં આવી છે, તો આ setting checkout step માં સ્થાપિત directives નું માન રાખશે.
Assign Site Template સ્પષ્ટ કરવાથી specified template ની selection force થાય છે. પરિણામે, checkout process માં કોઈપણ template selection steps દૂર થાય છે.
છેલ્લે, Choose Available Site Templates checkout step માં specified templates ને આ setting માં select કરેલ templates સાથે override કરે છે. ગ્રાહકને selection માં મદદ કરવા માટે pre-selected template પણ વ્યાખ્યાયિત કરી શકાય છે.
આખરે જો network administrator ઈચ્છે છે કે template selection checkout steps માં થાય તો 'default' ની setting પૂરતી હશે. વૈકલ્પિક રીતે template selection દૂર કરવા અને lock કરવા અને selection ને plan settings પર delegate કરવા માટે 'assign new template' અથવા 'choose available site templates' વિકલ્પો ઇચ્છનીય હોઈ શકે છે.
Sites
Sites tab Ultimate Multisite ની limitations functionality નો ભાગ છે.
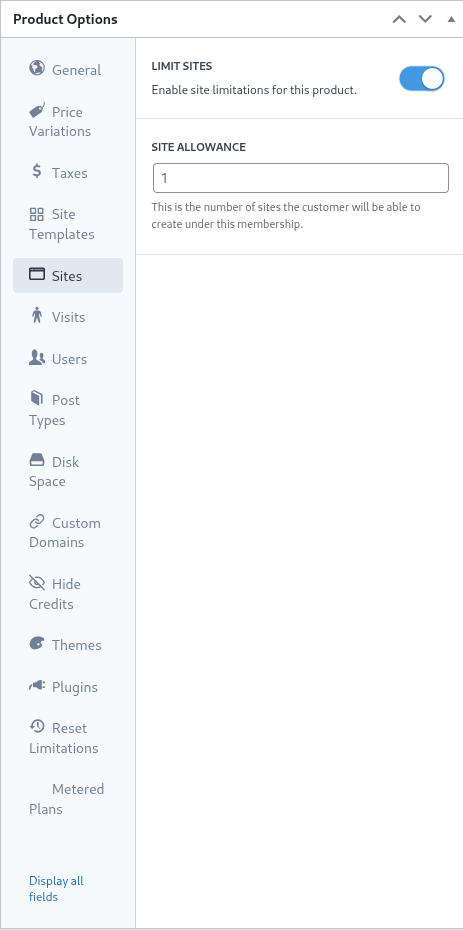
આ setting ગ્રાહક તેમની membership હેઠળ બનાવી શકે તેવી sites ની maximum સંખ્યા સ્પષ્ટ કરે છે.
limitation enable કરવા માટે, limit sites toggle ને તેની active state પર સેટ કરો અને site allowance field માં sites ની maximum સંખ્યા સ્પષ્ટ કરો.
Visits
Visits tab Ultimate Multisite ની limitations system નો વધુ ભાગ છે. આ setting ગ્રાહકની site પર unique visitors ના accounting અને ત્યારબાદ throttling ની મંજૂરી આપે છે.
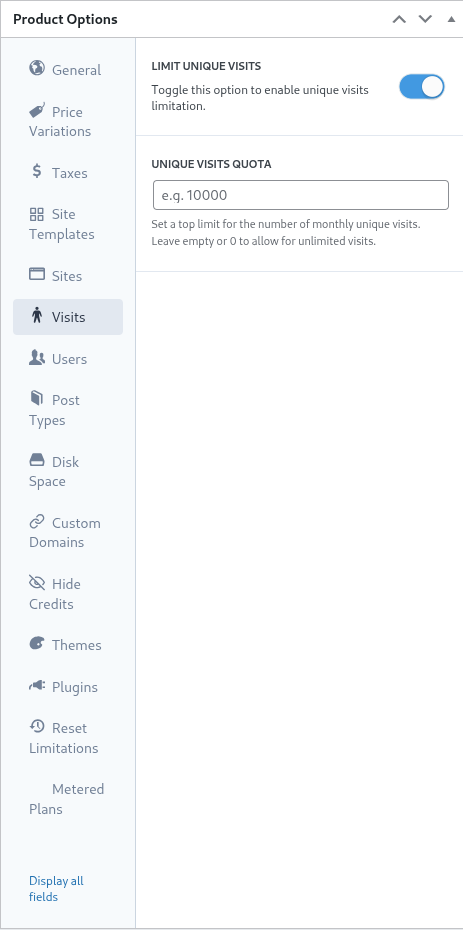
marketing perspective થી, network administrators આ setting નો ઉપયોગ ગ્રાહકોને limits reach થાય ત્યારે તેમનો plan upgrade કરવા પ્રોત્સાહિત કરવાના માધ્યમ તરીકે કરી શકે છે. આ setting network administrator ને system resources preserve કરવા માટે sites પર excessive traffic ને curb અને prevent કરવામાં પણ મદદ કરી શકે છે.
આ feature નો ઉપયોગ કરવા માટે, limit unique visits toggle ને તેની active state પર સેટ કરો અને unique visits quota field માં unique visitors ની maximum સંખ્યા સ્પષ્ટ કરો.
એકવાર આ limit reach થાય, Ultimate Multisite ગ્રાહકની site serve કરવાનું બંધ કરશે અને તેના બદલે limits exceed થઈ ગઈ છે તે indicate કરવા message display કરશે.
Users
Ultimate Multisite ની 'Users' limitations network administrator ને બનાવી શકાતા અને roles ને assign કરી શકાતા users ની સંખ્યા પર limits impose કરવાની મંજૂરી આપે છે.
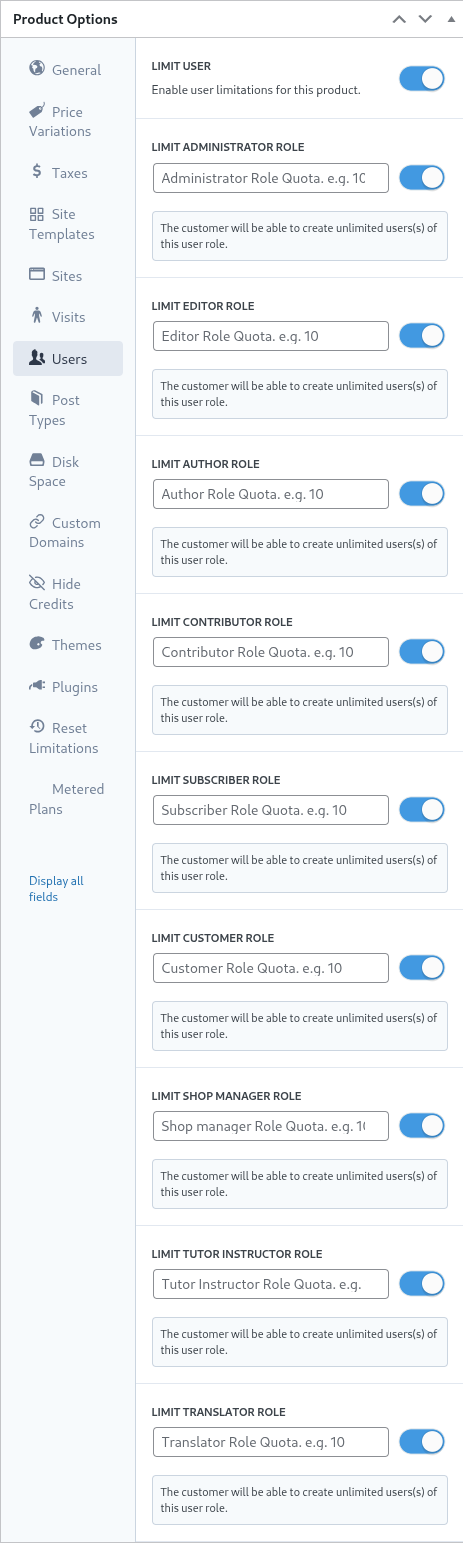
limitations feature enable કરવા માટે, limit user toggle ને જમણી તરફ slide કરીને તેની active state પર સેટ કરો.
પછી દરેક role માટે જે limited હોવી જોઈએ, તેની બાજુના toggle ને active state પર સેટ કરો અને appropriate field માં maximum upper limit વ્યાખ્યાયિત કરો.
Post Types
Post Types tab network administrator ને WordPress માં post types ની extensive array પર granular limits impose કરવાની મંજૂરી આપે છે.
WordPress ની construction ને કારણે, posts અને post types તેની core functionality નો significant component છે, અને આમ Ultimate Multisite ની limitations system network administrator ને limits establish અને maintain કરવામાં સહાય કરવા માટે designed છે.
આ limits subsystem enable કરવા માટે, limit post types toggle ને જમણી તરફ slide કરીને તેની active state પર સેટ કરો.
પછી, દરેક post type માટે જે limited હોવી જોઈએ, તેને જમણી તરફ slide કરીને toggle on કરો અને appropriate field માં maximum upper limit સ્પષ્ટ કરો.
Disk Space
Disk Space tab network administrators ને ગ્રાહકો દ્વારા consume થતી space restrict કરવાની મંજૂરી આપે છે.

સામાન્ય રીતે WordPress multisite માં core files બધી sites વચ્ચે shared હોય છે અને media files અને uploads માટે individual directories બનાવવામાં આવે છે જેના પર આ settings અને limitations લાગુ થાય છે.
disk usage limitation enable કરવા માટે, limit disk size per site toggle ને જમણી તરફ slide કરીને તેની active state પર સેટ કરો.
પછી, disk space allowance field માં megabytes માં maximum upper limit સ્પષ્ટ કરો.
Custom Domain
આ option toggle કરીને તમે ખાસ કરીને આ plan પર custom domains ની મંજૂરી આપી શકો છો.

Themes
product options માં Themes tab network administrator ને ગ્રાહકોને selection માટે themes ઉપલબ્ધ કરાવવાની અને optionally theme ની state force કરવાની મંજૂરી આપે છે.

નોંધ: themes ગ્રાહકોને ઉપલબ્ધ કરાવવા માટે તેઓ network administrator દ્વારા network enabled હોવા જોઈએ.
visibility option વ્યાખ્યાયિત કરે છે કે આ theme ગ્રાહકને તેમની site માં Appearance > Themes tab જોતી વખતે visible છે કે નહીં. આ option ને Hidden પર સેટ કરવાથી theme view માંથી દૂર થાય છે અને આમ તેને select અને activate કરવાની ability restrict થાય છે.
behavior selection network administrator ને ગ્રાહક site ની creation પર theme ની state વ્યાખ્યાયિત કરવાની મંજૂરી આપે છે.
Available state માં theme ગ્રાહકને self-activation માટે ઉપલબ્ધ કરાવવામાં આવે છે. તેનાથી વિપરીત, Not Available state ગ્રાહક પાસેથી theme activate કરવાની ability દૂર કરે છે. છેલ્લે, Force Activate option theme ની selection અને activation force કરે છે અને આમ site creation પર તેને default તરીકે સેટ કરે છે.
Plugins
Themes tab ની જેમ, Ultimate Multisite network administrator ને ગ્રાહકોને plugins ની visibility તેમજ નવી site ની creation પર તેમની state વ્યાખ્યાયિત કરવાની મંજૂરી આપે છે.

visibility drop-down plugin ને ગ્રાહકને Plugins menu option દ્વારા તેમની site પર જોવામાં આવે ત્યારે visible અથવા hidden રાખવાની મંજૂરી આપે છે.
network administrator behavior drop-down માં options નો ઉપયોગ કરીને plugins ના behavior ને વધુ manipulate કરી શકે છે.
Default selection ગ્રાહક દ્વારા selected site template માં વ્યાખ્યાયિત plugin state નું માન રાખે છે. આમ template માં activated plugins template ગ્રાહકની site પર clone થાય ત્યારે activated રહેશે.
Force Activate site creation પર plugin ને active state માં મૂકે છે અને તેનાથી વિપરીત Force Inactivate site creation પર plugin ને deactivate કરે છે. આ બંને સંજોગોમાં, plugin ની state ગ્રાહક દ્વારા તેમના WordPress Plugins menu દ્વારા manually alter કરી શકાય છે.
Force Activate & Lock setting similarly operate કરે છે પરંતુ plugin state �ને ગ્રાહક દ્વારા alter થતી અટકાવે છે. આમ Force Activate and Lock ની setting plugin ને તેની active state માં force કરશે અને ગ્રાહકને તેને deactivate કરતા અટકાવશે. એ જ રીતે, Force Inactivate & Lock setting plugin ને તેની inactive state માં force કરશે અને user ને plugin activate કરતા અટકાવશે.
network administrator site templates સાથે Force Activate & Lock અને Force Inactivate & Lock settings consider કરવા ઈચ્છી શકે છે કારણ કે templates માં plugins અને plugin states select કરવામાં આવે તો આ settings દ્વારા impacted થઈ શકે છે.
Reset Limitations
Reset Limitations tab product પર વ્યાખ્યાયિત બધી custom limits reset કરે છે. limitations reset કરવા માટે reset limitations button પર click કરો.

action confirm કરવા માટે confirm reset toggle ને જમણી તરફ તેની active state પર slide કરો અને reset limitations button પર click કરો.
Product Edit, Duplicate, અથવા Delete કરો
Existing products ને Ultimate Multisite > Products પર navigate કરીને અને existing product name પર hover કરીને edit, duplicate અથવા delete કરી શકાય છે.
