Checkout Forms
Checkout Forms are an easy and flexible way to experiment with different approaches when trying to convert new customers.
Ultimate Multisite 2.0 offers a Checkout Form editor that allows you to create as many forms as you want, with different fields, products on offer, etc.
To access this feature, go to the Checkout Forms menu, on the left side-bar.
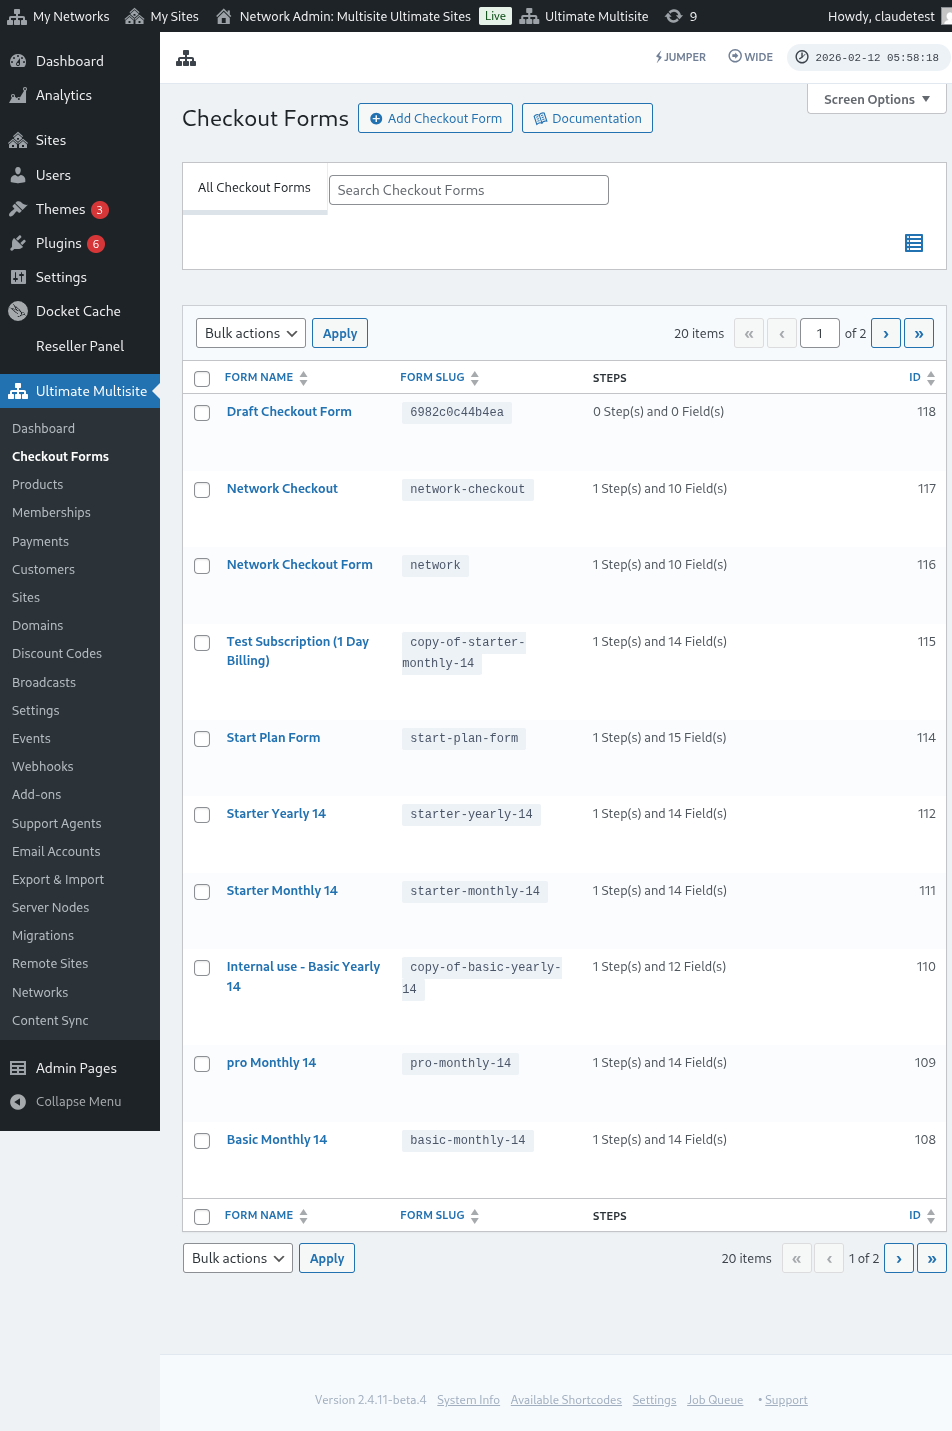
On this page, you can see all the checkout forms you have.
The list table includes a Status column so you can confirm whether each form is currently available to customers:
| Status | Meaning |
|---|---|
| Active | The form can be used anywhere its shortcode or registration page is published. |
| Inactive | The form is saved but disabled. Customers cannot complete checkout with it until you enable it again. |
Use the status column before editing a public registration flow, especially when you keep draft or seasonal checkout forms alongside your live forms.
If you want to create a new one, just click Add Checkout Form on the top of the page.
You can select one of these three options as your starting point: single step, multi-step or blank. Then, click to Go to the Editor.
When you choose single step or multi-step as your starting point, the form template now includes a Template Selection field by default. This field lets your customers pick a site template during the registration process. You can leave it in place, remove it, or reposition it like any other field in the editor.
Alternatively, you can edit or duplicate the forms you already have by clicking on the options below its name. There, you will also find the options to copy the form's shortcode or to delete the form.

Checkout Form Editor Overview
The checkout form editor provides a comprehensive interface for building your registration forms. Here's an overview of the editor layout:
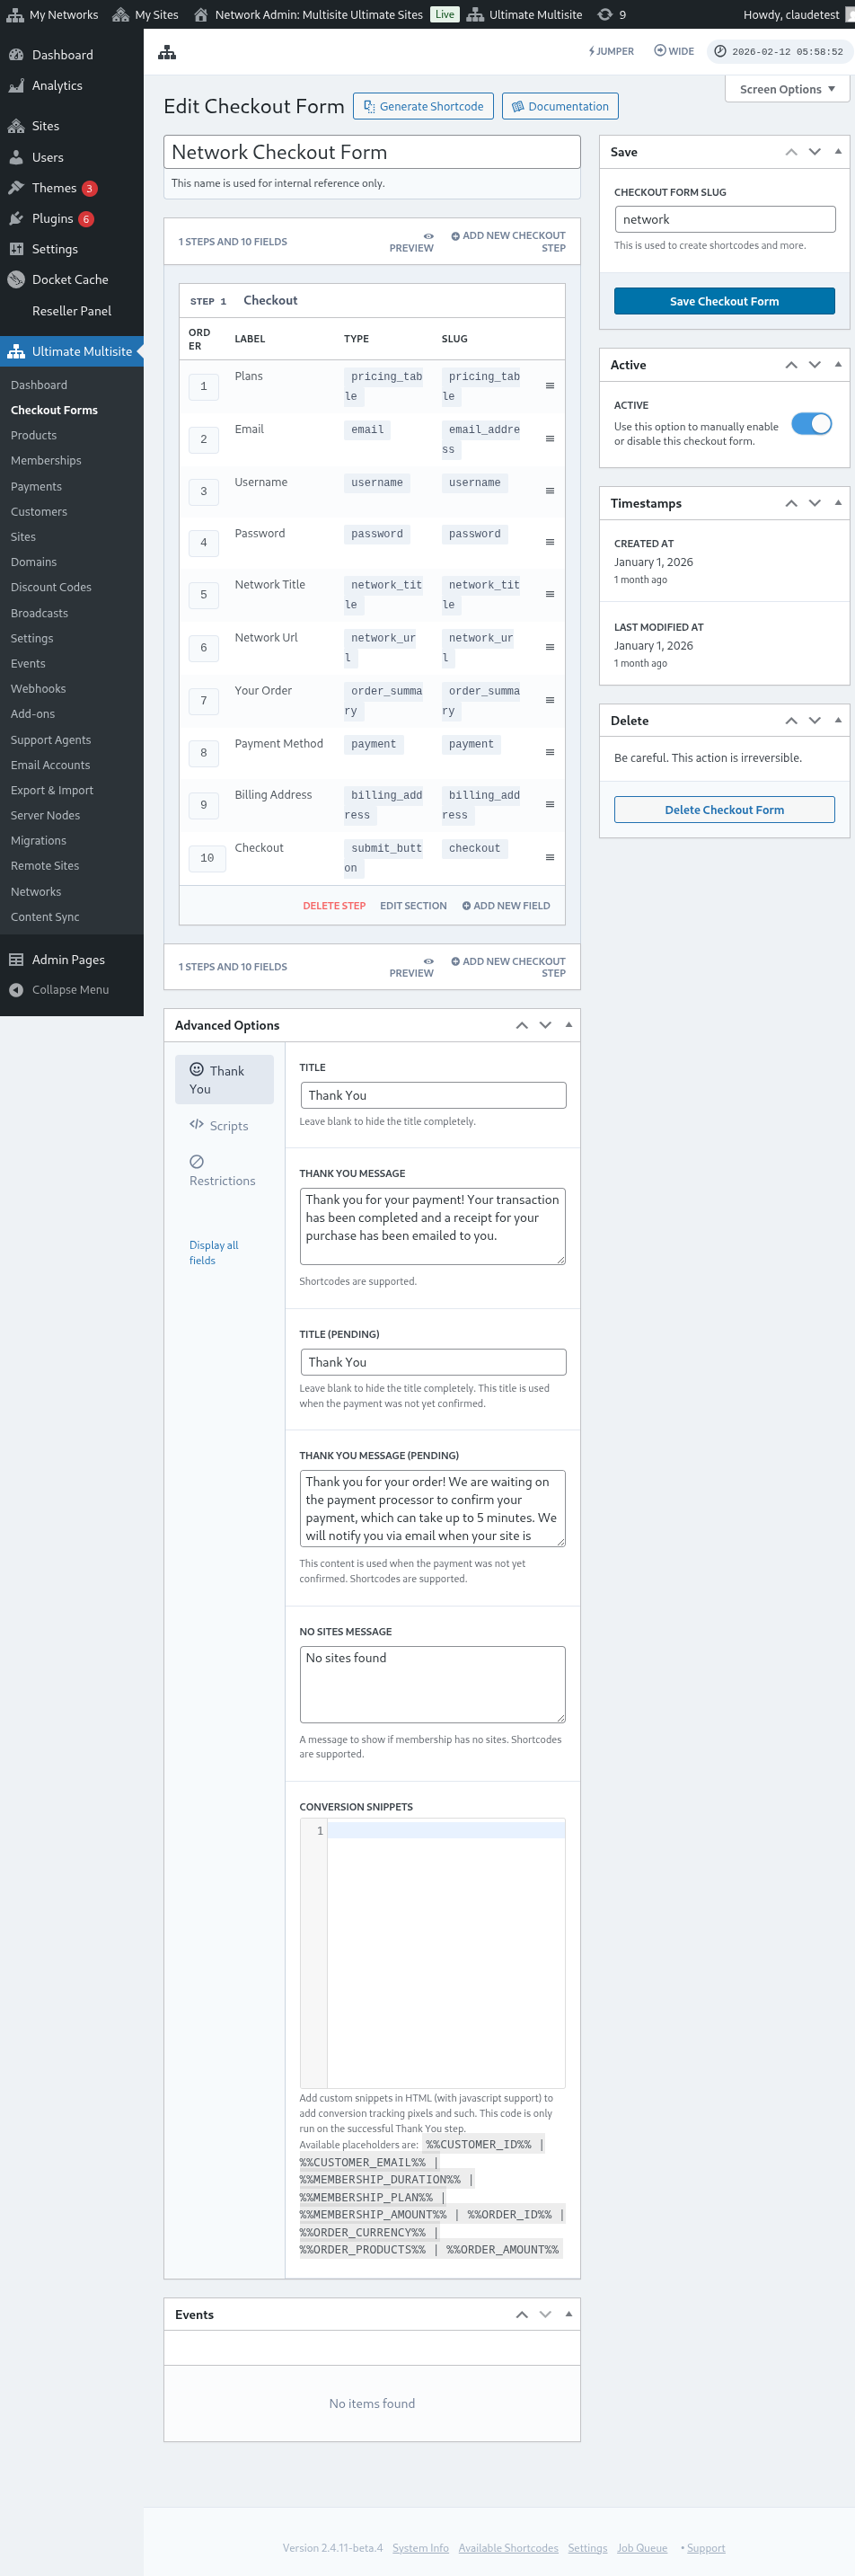
Editing a Checkout Form
You can create checkout forms for different purposes. In this example we will work on a registration form.
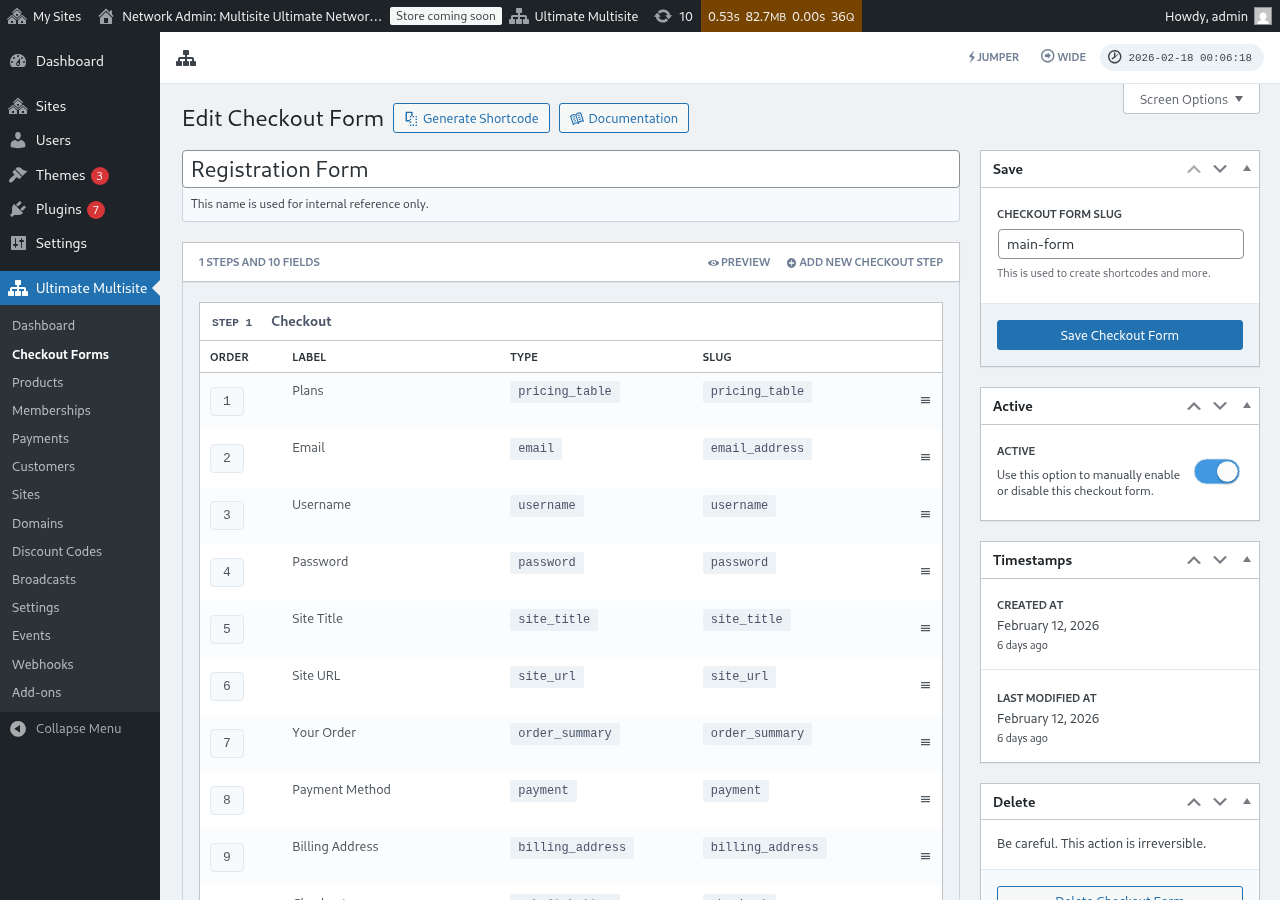
After navigating to the checkout form editor, give your form a name (that will be used for internal reference only) and a slug (used to create shortcakes, for example).
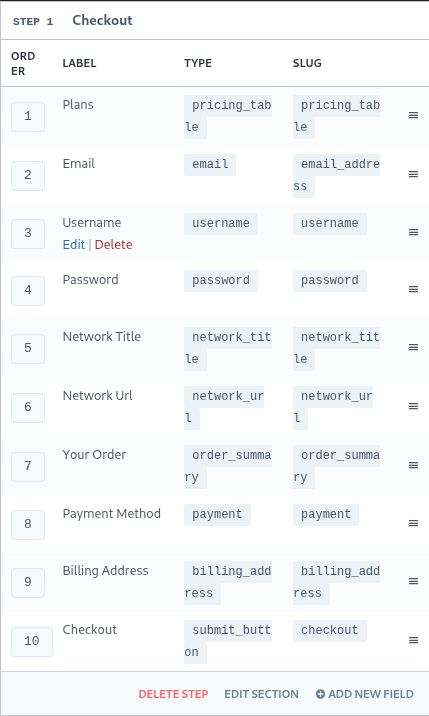
Forms are made of steps and fields. You can add a new step by clicking on Add New Checkout Step.

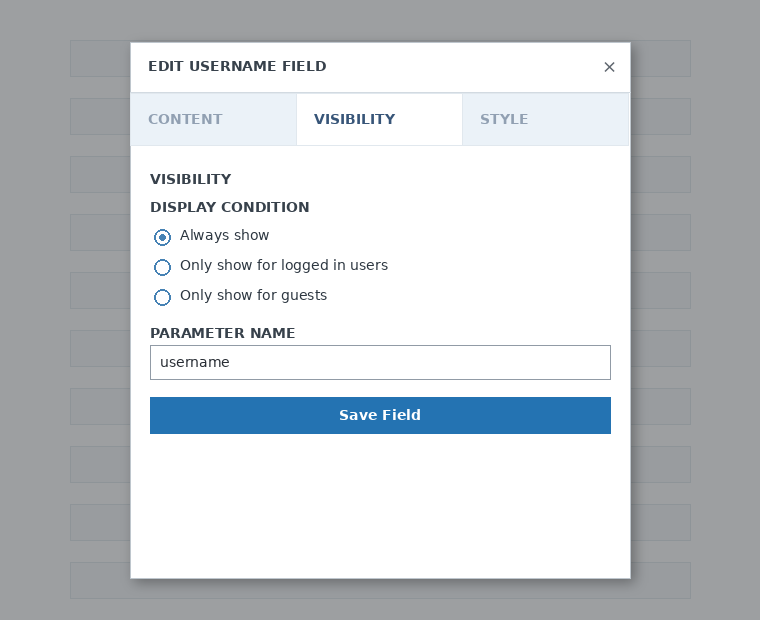
On the first tab of the modal window, fill the content of your form's step. Give it an ID, a name and a description. These items are mostly used internally.
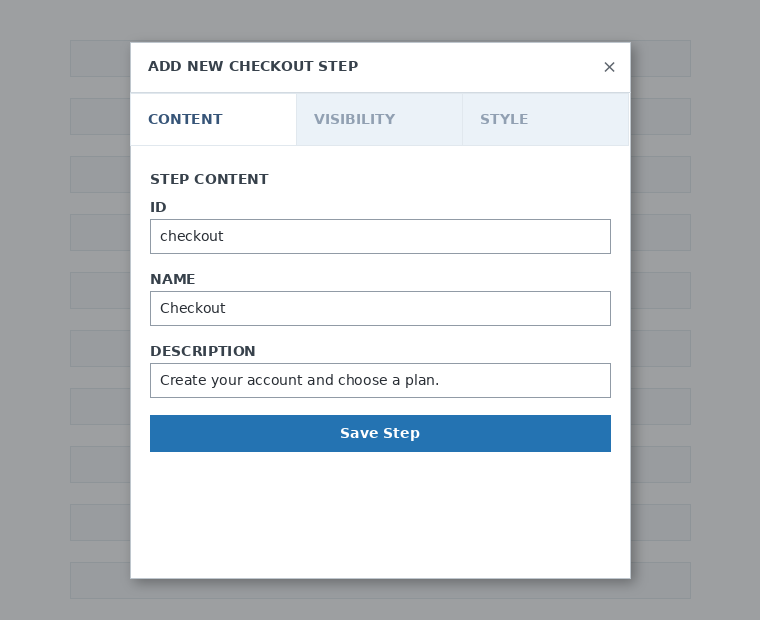
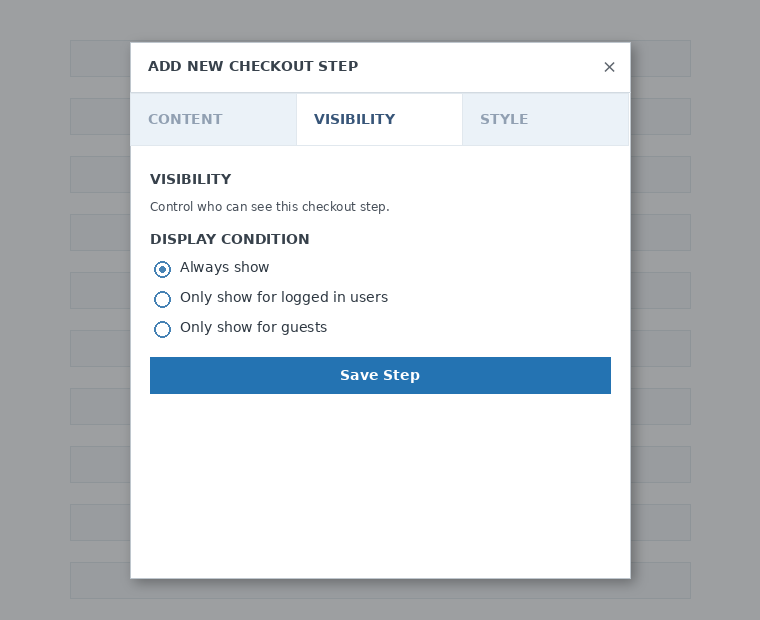
Next, set the visibility of the step. You can choose between "Always show", "Only show for logged in users" or "Only show for guests".
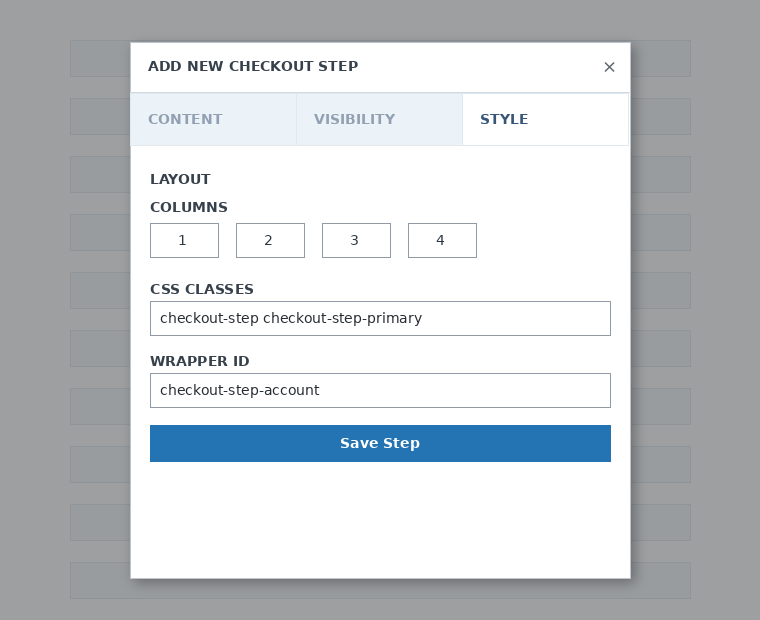
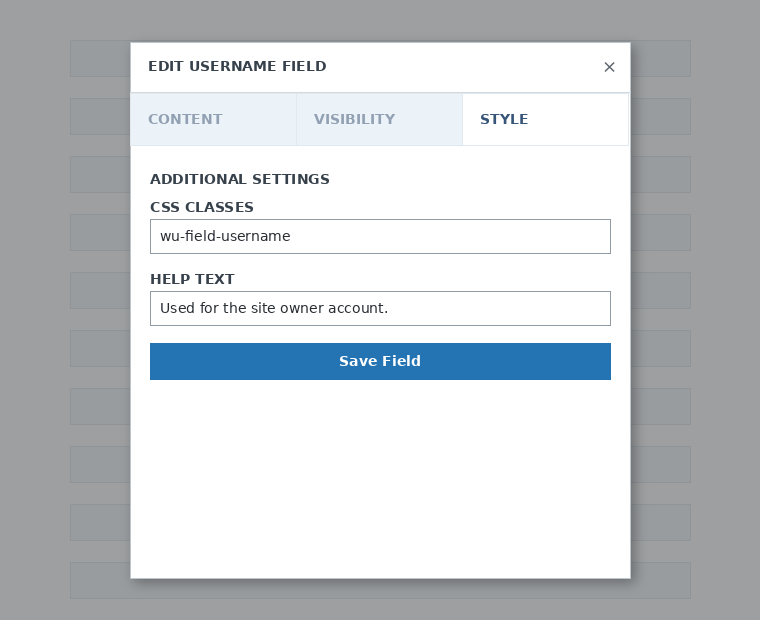
Finally, configure the step style. These are optional fields.
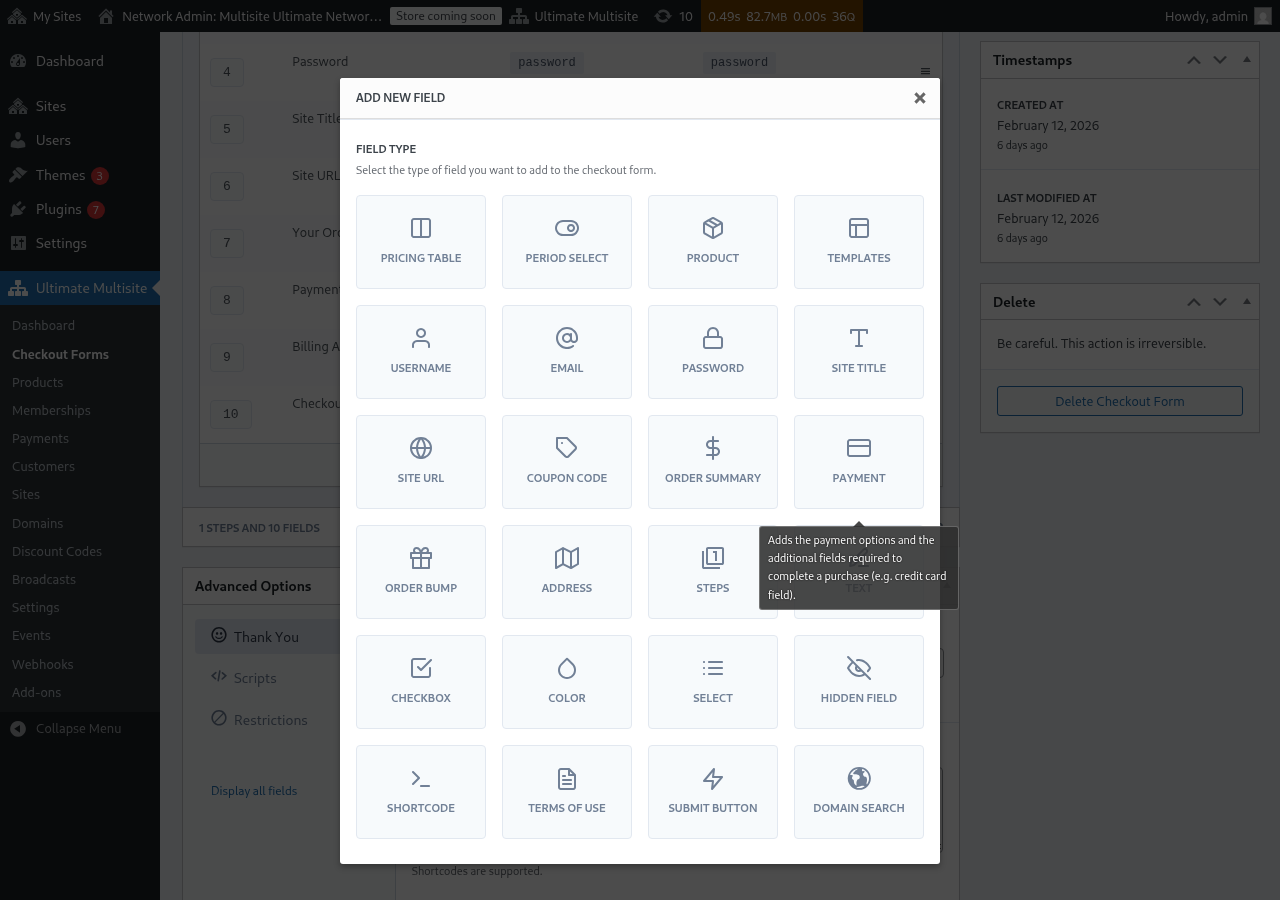
Now, it's time to add fields to our first step. Just click to Add New Field and select the type of section you want.
Each field has different parameters to be filled. For this first entrance, we will select the "Username" field.

You can add as many steps and fields as you need. To display your products for your customers to pick one, use the Pricing Table field. If you want to let your clients choose a template, add the Template Selection field. And so on.

Note: username, email, password, site title, site URL, order summary, payment, and submit button are mandatory fields to create a checkout form.
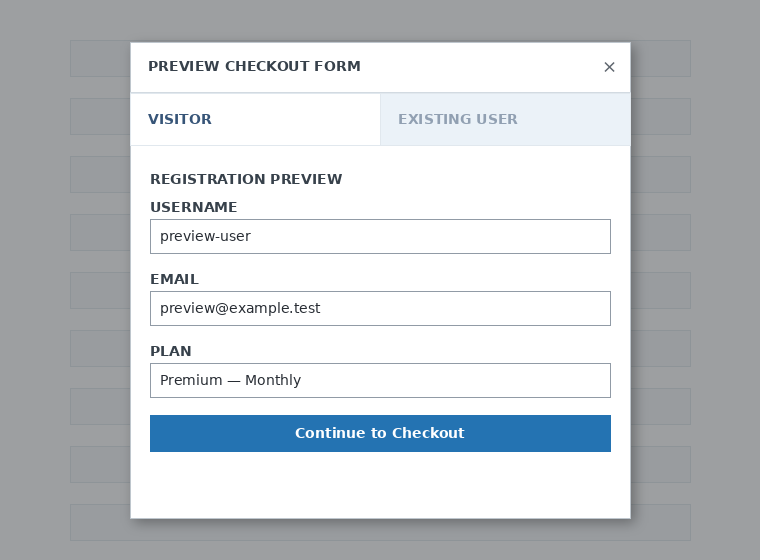
While you are working on your checkout form, you can always use the Preview button to see how your clients will see the form. You can also alternate between view as an existing user or a visitor

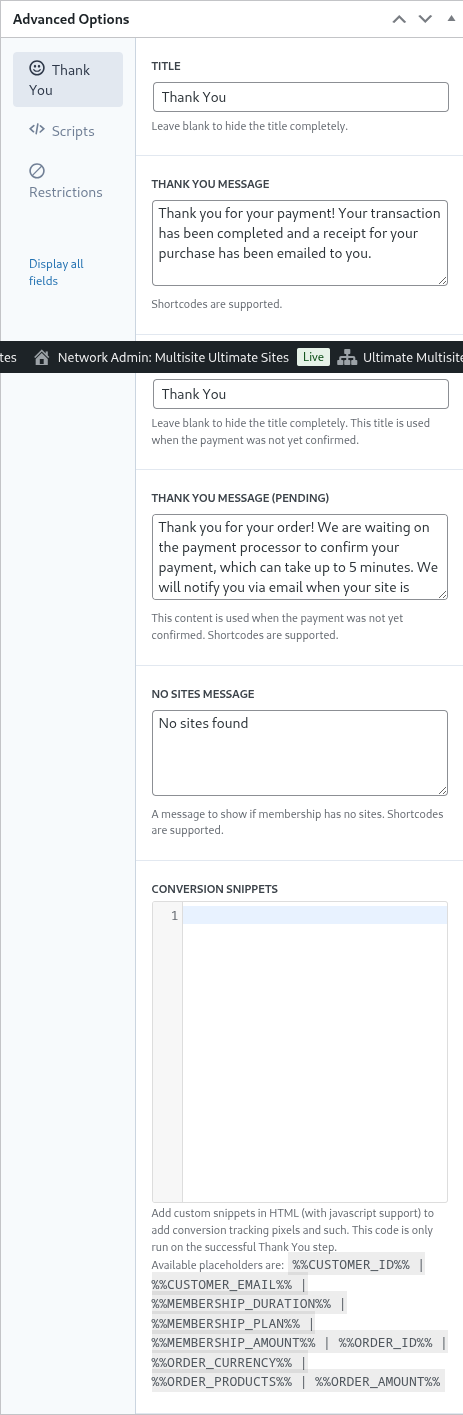
Finally, on Advanced Options you can configure the message for the "Thank You" page, add snippets to track conversions, add custom CSS to your checkout form or restrict it to certain countries.
You can also manually enable or disable your checkout form by toggling this option on the right column, or delete permanently the form.

To delete a form, click the delete option in the form actions:

Don't forget to save your checkout form!

To get your form's shortcode click to Generate Shortcode and copy the result shown on the modal window.
The Pricing Table Field
The Pricing Table field displays your products on the checkout form so customers can choose a plan. When you edit this field, you can configure several options:

Here's how the pricing table appears on the frontend registration form:

- Products: Select which products to display and the order they appear in.
- Force Different Durations: When enabled, all products are shown regardless of whether they have a matching price variation for the currently selected billing period. When disabled (default), products without a variation for the selected period are hidden.
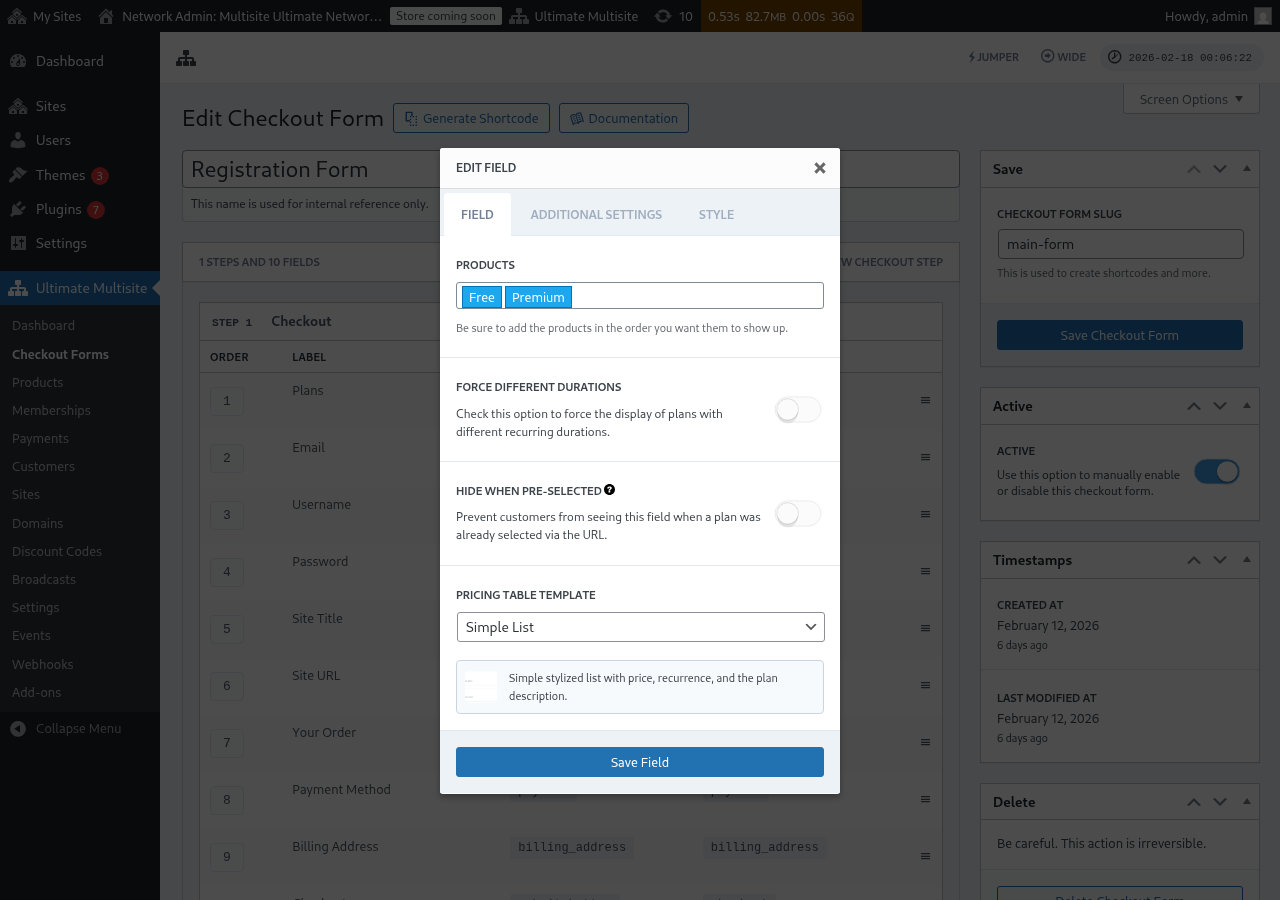
- Hide when Pre-Selected: Hides the pricing table when a plan has already been selected via the URL (e.g.
/register/premium). - Pricing Table Template: Choose the visual template for the pricing table (Simple List, Legacy, etc.).
If you add a product to the Pricing Table before the form includes the fields required to complete that product's checkout flow, the editor now shows a warning. Use the warning to add the missing required field before publishing or saving changes for a live registration form.
Adding a Period Selection Toggle
If you have configured Price Variations on your products (e.g. monthly and annual pricing), you can add a Period Selection field to your checkout form. This field displays a toggle that allows customers to switch between billing periods, and the pricing table updates dynamically in real time.
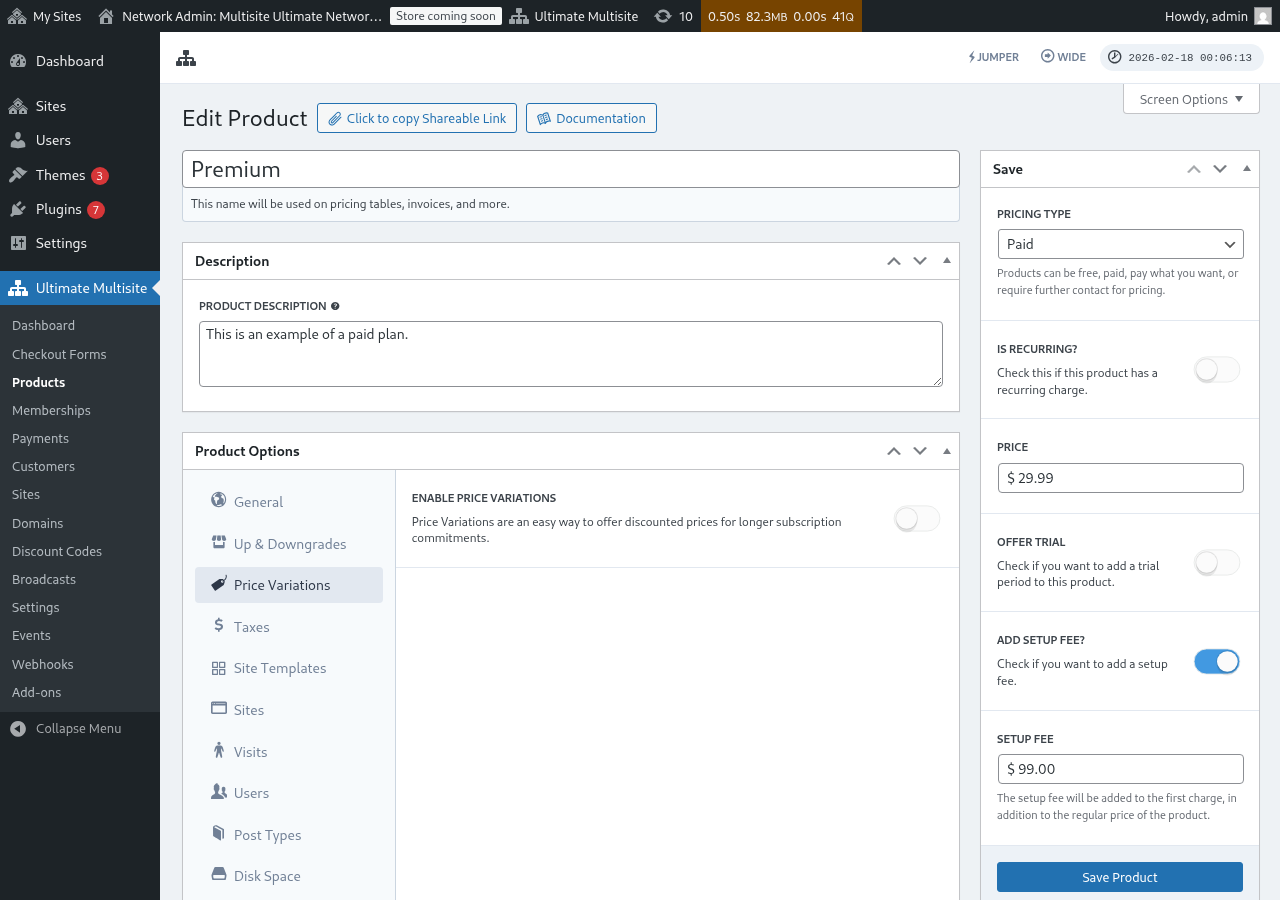
Step 1: Set Up Price Variations on Your Products
Before adding the Period Selection field, make sure your products have price variations configured. Go to Ultimate Multisite > Products, edit a product, and navigate to the Price Variations tab to add alternate billing periods (e.g. Annual at a discounted price).
Step 2: Add the Period Selection Field to Your Checkout Form
-
Go to Ultimate Multisite > Checkout Forms and edit your checkout form.
-
Scroll down to the step that contains your Pricing Table field and click Add new Field.
-
In the field type selection dialog, click Period Select.
-
Configure the period options. Each option needs:
- Duration: The number (e.g.
1) - Duration unit: The period type (Days, Weeks, Months, or Years)
- Label: The text customers will see (e.g. "Monthly", "Annual")
- Duration: The number (e.g.
-
Click + Add Option to add more period choices. These options must match the price variations you configured on your products.

-
Choose a Period Selector Template (Clean is the default, which renders a simple styled selector ready for custom CSS).
-
Click Save Field.
Step 3: Position the Field Above the Pricing Table
For the best user experience, make sure the Period Selection field appears before the Pricing Table field in your checkout step. You can drag fields to reorder them in the checkout form editor. This way, customers first choose a billing period and then see prices for that period.
How It Works on the Frontend
Once configured, customers visiting your registration page will see the period selector above the pricing table. When they click a different billing period:
- The pricing table instantly updates to show prices for the selected period (no page reload required).
- If Force Different Durations is disabled on the Pricing Table field, products without a price variation for the selected period will be hidden.
- If Force Different Durations is enabled, all products remain visible even if they don't have a variation for the selected period (they will show their default price).
Pre-selecting a Billing Period via URL
You can also pre-select a product and billing period through the URL. Ultimate Multisite supports these URL patterns:
/register/premium— Pre-selects the "Premium" product only/register/premium/12— Pre-selects the product and 12-month duration/register/premium/1/year— Pre-selects the product with a 1-year duration
The Template Selection Field
The Template Selection field lets customers choose a site template during checkout. It is now included by default in the single step and multi-step checkout form templates added in Ultimate Multisite v2.6.1.
Adding the field manually
If you are working with a form that was created before v2.6.1, or started from a blank template:
- Go to Ultimate Multisite > Checkout Forms and edit your checkout form.
- In the step where site details are collected, click Add new Field.
- Select Template Selection from the field type dialog.
- Configure the field:
- Label — The heading customers see above the template grid (e.g. "Choose a site template").
- Required — Whether customers must select a template before proceeding.
How it works
When a customer picks a template during checkout, Ultimate Multisite uses it when provisioning their new site. The templates shown come from your Site Templates list (Ultimate Multisite > Site Templates). Only templates marked as available to customers appear here.
Checkout-form base domains
Ultimate Multisite v2.13.0 treats domains configured on checkout form Site URL fields as network base domains. Use the field's available-domain settings when you want customers to create sites under one or more shared registration domains, such as example.com and sites.example.com.
Shared checkout-form base domains are not treated as per-site custom domain mappings. When a customer creates a subdirectory site on one of those bases, Ultimate Multisite does not create a mapped-domain record that would make the shared host belong to only that one site. The shared host remains available for sibling sites that use the same checkout form base.
Keep custom domains for per-customer mapped hosts, such as customer-example.com. Keep checkout-form base domains for shared registration hosts that many sites can use.
Removing the field
If you do not offer site templates, remove the Template Selection field from your form. Customers will then receive whichever default template is configured under Ultimate Multisite > Settings > Site Templates.