The Registration Flow (v2)
NOTE สำคัญ: Article นี้พูดถึง Ultimate Multisite version 2.x นะครับ.
Users txoj register in different ways to your network. They can use your registration form or a shareable link to a pre-selected plan. Here we will show you how your customers can register on your network using the available paths and what happens after they register on your network.
Using the Registration Form:
This is the standard registration process. You create a registration page with a checkout form and this will be where your customers will go to register on your network and subscribe to a plan. You can have multiple registration pages, each one with a different registration form if you want.
The default page for registration is yourdomain.com/register, but you can change this at any time on Ultimate Multisite > Settings > Login & Registration > Default Registration Page.
After a user get to your registration page (usually clicking on a Sign in or Buy now button), they will se your registration form there.

Here's an example of the checkout form as it appears on the frontend:
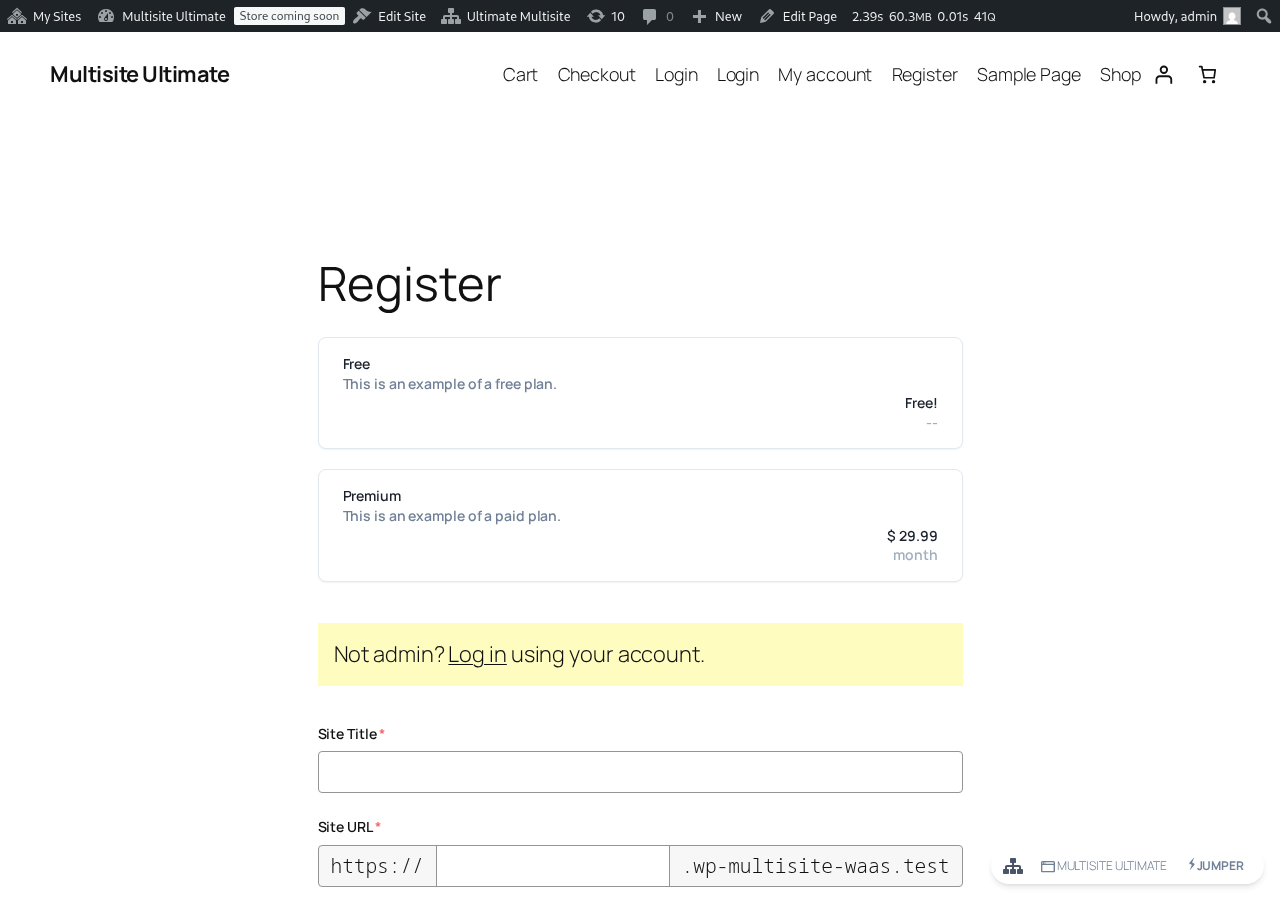
All they have to do is filling all the mandatory fields - email, username, password, etc... - and pay for the plan or confirm their email address if they are registering for a free plan or a paid plan with trial period without payment information.
On the "Thank you" page, they will see a message telling them if they need to confirm their email address or if their website is already activated and they can start using it.

ຖ້າຮຽກຮ້ອງໃຫ້ຢືນຢັນທີ່ຢູ່ອີເມວ, ພວກເຂົາຈະຕ້ອງເຂົ້າໄປໃນ Inbox ອີເມວຂອງຕົນເອງ ແລະ ກົດໃສ່ລິ້ງຢືນຢັນ. ເວັບໄຊທ໌ຂອງເຂົາເຈົ້າຈະບໍ່ຖືກເປີດໃຊ້ງານຖ້າທີ່ຢູ່ອີເມວຂອງເຂົາເຈົ້າບໍ່ໄດ້ຮັບການຢືນຢັນ.
ຖ້າພວກເຂົາໄດ້ລົງທະບຽນໃນແຜນຈ່າຍ ຫຼື ການຢືນຢັນອີເມວບໍ່ແມ່ນຂໍ້ກຳນົດສຳລັບເຄືອຂ່າຍຂອງທ່ານ, ພວກເຂົາຈະມີເວັບໄຊທ໌ຂອງເຂົາເຈົ້າຖືກເປີດໃຊ້ງານທັນທີຫຼັງຈາກການຈ່າຍເງິນ ແລະ ຈະສະແດງລິ້ງເພື່ອເຂົ້າສູ່ລະບົບ dashboard ຂອງເຂົາເຈົ້າ.

ການໃຊ້ Shareable Link:
ຂັ້ນຕອນການລົງທະບຽນໂດຍໃຊ້ shareable link ແມ່ນຄືກັບແບບຟອມລົງທະບຽນປົກກະຕິ, ຄວາມແຕກຕ່າງພຽງແຕ່ແມ່ນວ່າການໃຊ້ shareable link, ລູກຄ້າຂອງທ່ານສາມາດເລືອກ product ຫຼື website template ລ່ວງໜ້າໃນແບບຟອມຈ່າຍເງິນ (ເບິ່ງສ່ວນ Pre-selecting products and templates via URL parameters) ຫຼື ອາດຈະມີ coupon code ເພີ່ມເຂົ້າມາໄດ້ (ເບິ່ງສ່ວນ Using URL Parameters).
ຂັ້ນຕອນການລົງທະບຽນຈະຄືກັນ: ພວກເຂົາຈະຕ້ອງໃສ່ຊື່, username, email address, ຊື່ເວັບໄຊ ແລະ ຫົວຂໍ້ ຕ່າງໆ... ແຕ່ແຜນຈ່າຍ ຫຼື website template ຈະຖືກເລືອກໄວ້ລ່ວງໜ້າໃຫ້ພວກເຂົາແລ້ວ.
ການລົງທະບຽນໂດຍໃຊ້ການຈ່າຍເງິນແບບແຮງ (Manual Payments):
ຖ້າທ່ານບໍ່ຕ້ອງການໃຊ້ PayPal, Stripe ຫຼື ເຄື່ອງມືຊໍາລະເງິນອື່ນໆທີ່ Ultimate Multisite ຫຼື add-on ຂອງມັນສະເໜີ, ທ່ານສາມາດໃຊ້ການຈ່າຍເງິນແບບແຮງໃຫ້ລູກຄ້າຂອງທ່ານໄດ້. ອັນນີ້ເຮັດໃຫ້ທ່ານສາມາດສ້າງ invoice ໃຫ້ເຂົາເຈົ້າຈ່າຍຜ່ານ payment processor ທີ່ທ່ານເລືອກຫຼັງຈາກທີ່ພວກເຂົາລົງທະບຽນໃນເຄືອຂ່າຍຂອງທ່ານ.
ຂັ້ນຕອນການລົງທະບຽນຈະຄືກັນກັບຂ້າງເທິງ, ແຕ່ໃນໜ້າລົງທະບຽນ ຂອງລູກຄ້າທ່ານຈະເຫັນຂໍ້ຄວາມທີ່ບອກວ່າເຂົາເຈົ້າຈະໄດ້ຮັບອີເມວທີ່ມີຄຳແນະນຳເພີ່ມເຕີມເພື່ອເຮັດການຈ່າຍເງິນໃຫ້ສຳເລັດ.

Registration ពេលអ្នកចុះឈ្មោះ, អ្នកនឹងឃើញការណែនាំអំពីការបង់ប្រាក់ដែលអ្នកបានកំណត់ (ហើយពួកគេក៏នឹងទទួលបានវានៅក្នុងអ៊ីមែលរបស់ពួកគេដែរ)។

អ្នកអាចផ្លាស់ប្តូរការណែនាំអំពីការបង់ប្រាក់នៅ Ultimate Multisite > Settings > Payments បន្ទាប់ពីបើកជម្រើស Manual (បង់ដោយដៃ)៖

បន្ទាប់ពីអតិថិជនរបស់អ្នកបានបញ្ចប់ការបង់ប្រាក់ដោយដៃ ហើយផ្ញើការបញ្ជាក់មកអ្នក, អ្នកត្រូវតែ ផ្ទៀងផ្ទាត់ការបង់ប្រាក់ដោយដៃ ដើម្បីបើកសមាជិកភាពរបស់អតិថិជន និងគេហទំព័រ។
ដើម្បីធ្វើបែបនេះ, សូមចូលទៅកាន់ Ultimate Multisite > Payments ហើយស្វែងរកការបង់ប្រាក់របស់អតិថិជននោះ។ វាគួរតែបង្ហាញស្ថានភាពជា Pending (កំពុងរង់ចាំ) នៅតែម្ដេចដែរ។
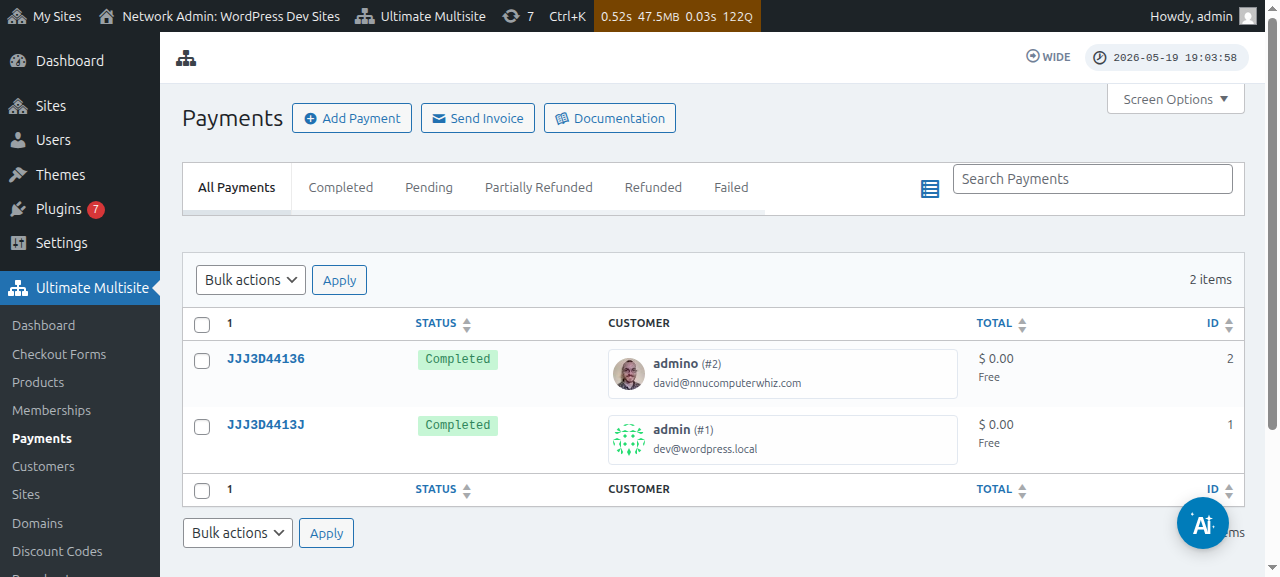
ចុចលើលេខការបង់ប្រាក់ ហើយអ្នកនឹងអាចផ្លាស់ប្តូរស្ថានភាពរបស់វាទៅជា Completed (បានបញ្ចប់)។
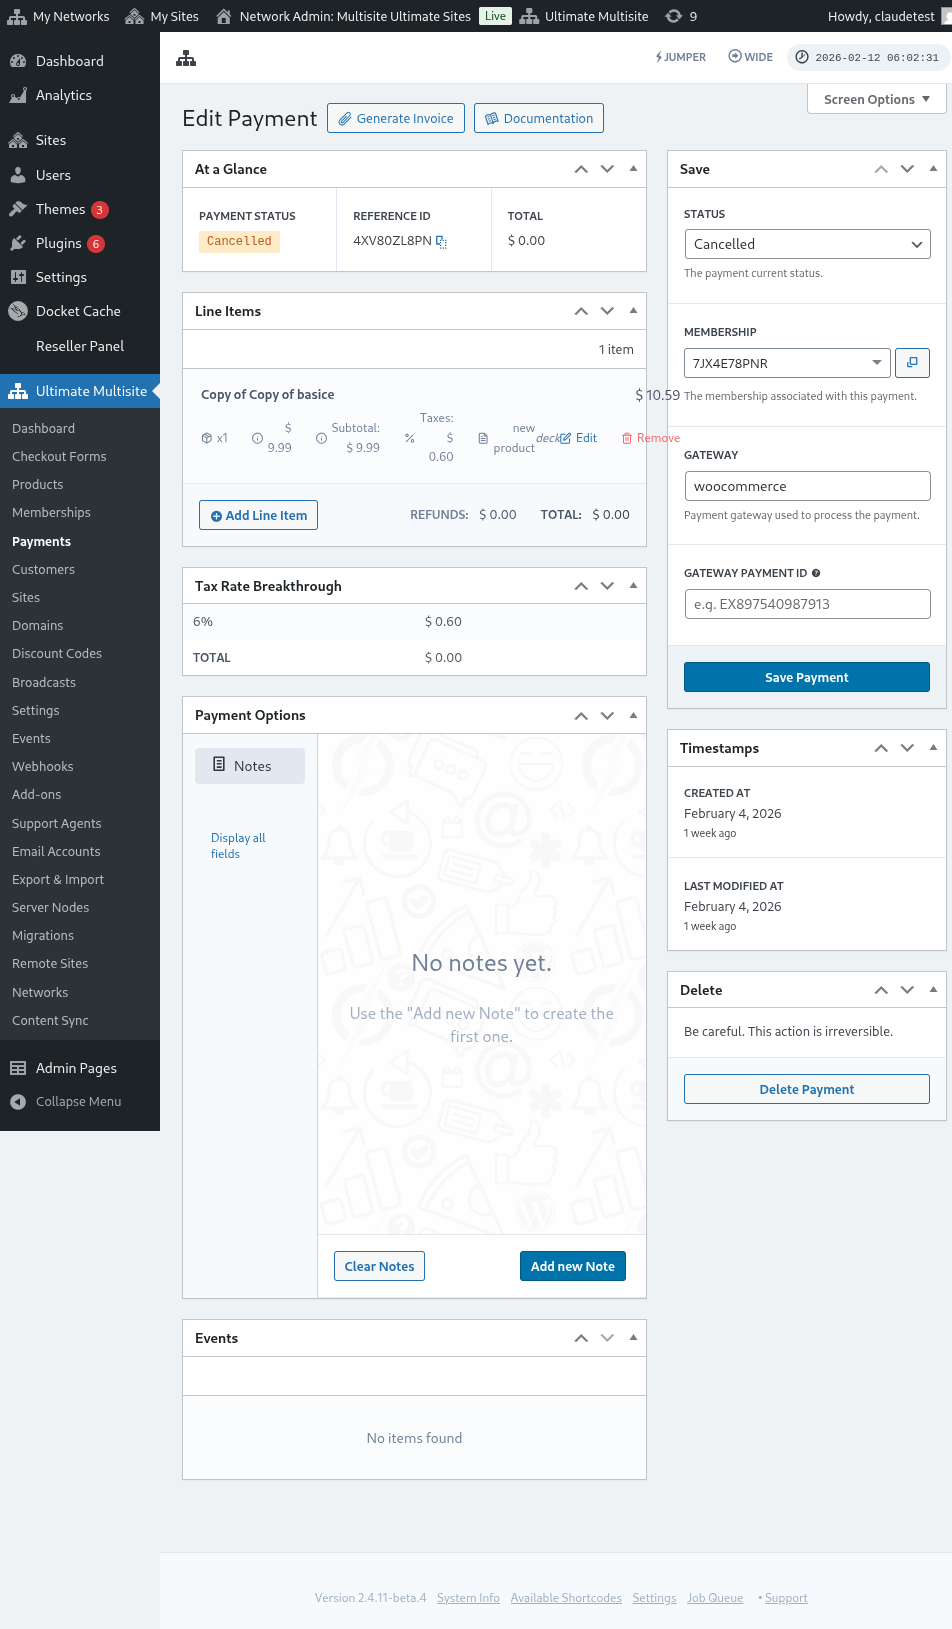

បន្ទាប់ពីផ្លាស់ប្តូរស្ថានភាពរបស់វាទៅជា Completed, អ្នកនឹងឃើញសារ Activate membership (បើកសមាជិកភាព)។ បើកជម្រើសនេះ on (បើក) ដើម្បីបើកសមាជិកភាព និងគេហទំព័រដែលភ្ជាប់ជាមួយអតិថិជននោះ។ បន្ទាប់មក, ចុចដើម្បី Save Payment (រក្សាទុកការបង់ប្រាក់)។

ឥឡូវនេះ អតិថិជនរបស់អ្នកនឹងអាចចូលប្រើ dashboard និងមុខងារទាំងអស់ដែលពួកគេបានចុះឈ្មោះ។