ຕັ້ງຄ່າ PayPal Gateway (v2)
ໝາຍເຫດສຳຄັນ: ບົດຄວາມນີ້ອ້າງອີງເຖິງ Ultimate Multisite version 2.x.
ເຈົ້າສາມາດເປີດໃຊ້ວິທີການຊຳລະເງິນໄດ້ເຖິງສີ່ວິທີໃນໜ້າຕັ້ງຄ່າການຈ່າຍເງິນຂອງພວກເຮົາ: Stripe, Stripe Checkout, PayPal ແລະ ດ້ວຍມື (Manual). ໃນບົດຄວາມນີ້, ພວກເຮົາຈະມາເຫັນວິທີການເຊື່ອມຕໍ່ກັບ PayPal.
ຄືກັບ Stripe, PayPal ນັ້ນຖືກໃຊ້ຢ່າງກວ້າງຂວາງສຳລັບການຈ່າຍເງິນອອນລາຍ, ໂດຍສະເພາະໃນເວັບໄຊ WordPress. ບົດຄວາມນີ້ຈະແນະນຳວິທີການໃຊ້ PayPal ເປັນວິທີການຊຳລະເງິນທີ່ມີຢູ່ໃນເຄືອຂ່າຍຂອງເຈົ້າ.
ຂໍໃຫ້ສັງເກດວ່າ ເຈົ້າຕ້ອງມີ PayPal Business account ເພື່ອໄດ້ຮັບ API credential (ຂໍ້ມູນເຂົ້າລະຫັດ) ທີ່ຕ້ອງການສຳລັບການເຊື່ອມຕໍ່ນີ້.
ການເປີດໃຊ້ PayPal ໃນເຄືອຂ່າຍຂອງເຈົ້າ
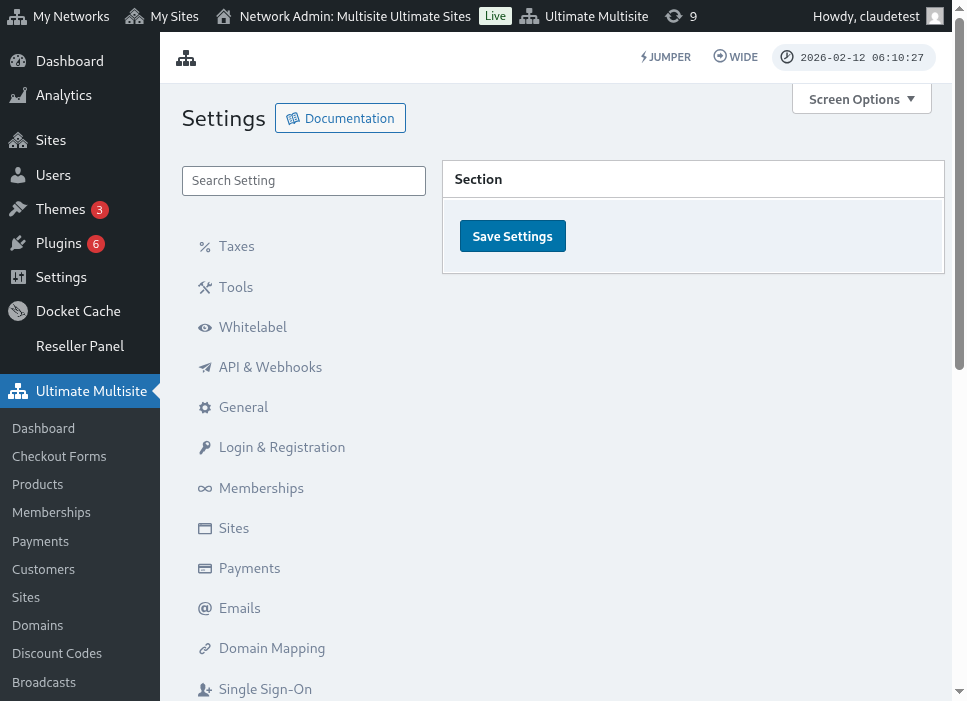
ເພື່ອເປີດໃຊ້ PayPal ເປັນວິທີການຊຳລະເງິນທີ່ມີໃຫ້ໃນເຄືອຂ່າຍຂອງເຈົ້າ, ໄປທີ່ Ultimate Multisite > Settings > Payments ແລ້ວໝາຍກ່ອງ (tick the box) ໃສ່ແຖບPayPal.
ການໃຊ້ setup wizard ແນະນຳ
Ultimate Multisite 2.10.0 ເພີ່ມ setup wizard ຂອງ PayPal ອອກມາໃນການຕັ້ງຄ່າ payment gateway. ຫຼັງຈາກທີ່ເຈົ້າເປີດໃຊ້ PayPal ແລ້ວ, ໃຫ້ໃຊ້ wizard ນັ້ນໃນ Ultimate Multisite > Settings > Payments ເພື່ອເລືອກວິທີທີ່ເຈົ້າຕ້ອງການເຊື່ອມຕໍ່ gateway ແລະຢືນຢັນວ່າຂໍ້ມູນໃດທີ່ຍັງຕ້ອງການກ່ອນບັນທຶກ.
Wizard ນີ້ຮອງຮັບສອງເສັ້ນທາງການຕັ້ງຄ່າ:
- Manual credential entry: Thaum xav (Use this path when you already have PayPal API credentials, when OAuth setup is not available for your account, or when you prefer to copy credentials from PayPal yourself). Enter API Username, API Password, and API Signature in the PayPal fields, then save the payment settings.
- OAuth connection gate: Thaum xav (Use this path only when the OAuth option is available and enabled for your install). The wizard shows the OAuth flow behind a feature flag, so networks without the flag continue to use the manual credential entry fields.
If koj tsis paiv (If you do not see the OAuth option in the wizard), complete the manual credential entry flow below. The gateway works with the same PayPal Business API credentials as previous Ultimate Multisite 2.x releases.
Luj tshawm hav PayPal API credentials
Once PayPal is enabled as a payment gateway, koj yuav tsis txhob (you will need) fill in the fields for PayPal API Username , PayPal API Password and PayPal API Signature.
Koj yuav tshawm hauv koj account Live or Sandbox.
(Remember that koj yuav tsim (you can use) the sandbox mode to test payments and see if the gateway is correctly setup. Just toggle on the correspondent section.)
To request API Signature or Certificate credentials for your PayPal account:
-
Go to koj Account Settings.
-
In the API access section, click Update.
-
ภายใต้ NVP/SOAP API integration (Classic), ໃຫ້ចុច Manage API credentials។
-
ຖ້າເຈົ້າໄດ້ສ້າງ API Signature ຫຼື Certificate ແລ້ວ, ເຈົ້າຈະຖືກນໍາໄປໜ້າທີ່ສາມາດຊອກຫາຂໍ້ມູນການເຂົ້າລະຫັດຂອງເຈົ້າໄດ້।
-
ໝາຍເຫດ: ຖ້າເຈົ້າຖືກຂໍໃຫ້ຢືນຢັນບັນຊີ PayPal, ໃຫ້ເຮັດຕາມຄໍາແນະນໍາເທິງໜ້າຈໍເລີຍ.
-
-
ເລືອກ ໜຶ່ງ (one) ໃນທາງເລືອກຕໍ່ໄປນີ້, ແລ້ວចុច Agree and Submit।
-
Request API Signature – ເລືອກສິ່ງນີ້ເພື່ອການຢັ້ງຢືນດ້ວຍ API Signature।
-
Request API Certificate – ເລືອກສິ່ງນີ້ເພື່ອການຢັ້ງຢືນດ້ວຍ API Certificate।
-
-
PayPal ຈະສ້າງຂໍ້ມູນການເຂົ້າລະຫັດ API ຂອງເຈົ້າດັ່ງນີ້:
-
API Signature credentials ປະກອບມີ API Username, API Password, ແລະ Signature, ເຊິ່ງບໍ່ໝົດອາຍຸ। ຄ່າເຫຼົ່ານີ້ຈະຖືກເຊື່ອງໄວ້ໂດຍຄ່າເລີ່ມຕົ້ນເພື່ອຄວາມປອດໄພເພີ່ມເຕີມ। ໃຫ້ចុច Show/Hide ເພື່ອເປີດ ຫຼື ປິດມັນ. ເມື່ອເຮັດສຳເລັດແລ້ວ, ໃຫ້ចុច Done។
-
API Certificate credentials ປະກອບມີ API Username, API Password, ແລະ Certificate, ເຊິ່ງຈະໝົດອາຍຸໂດຍອັດຕະໂນມັດຫຼັງຈາກສາມປີ. ໃຫ້ចុច Download Certificate ເພື່ອບັນທຶກ API Certificate ໄວ້ໃນ desktop ຂອງເຈົ້າ।
-
ແບບນີ້ແລ້ວ, ການເຊື່ອມຕໍ່ການຈ່າຍເງິນ PayPal ຂອງເຈົ້າກໍສໍາເລັດແລ້ວ!
ຖ້າເຈົ້າມີຄຳຖາມກ່ຽວກັບການຕັ້ງຄ່າ PayPal, ເຈົ້າສາມາດອ້າງອີງຈາກ Help Center ຂອງ PayPal ໄດ້ເລີຍ।