Ultimate Multisite Register API エンドポイント
このチュートリアルでは、Ultimate Multisite /register API エンドポイントを使用して、ネットワーク内の新規顧客のオンボーディングプロセス全体を作成し、Zapierでそれを実行する方法を学びます。
このエンドポイントは POST メソッドを使用し、URL https://yoursite.com/wp-json/wu/v2/register から呼び出されます。この呼び出しでは、ネットワーク内で 4 つのプロセスが実行されます:
- 新しい WordPress ユーザー、またはユーザーIDを通じて識別されたユーザーが作成されます。
- Ultimate Multisite の新しい顧客、または顧客IDを通じて識別された顧客が作成されます。
- WordPress ネットワーク上に新しいサイトが�作成されます。
- 最終的に、Ultimate Multisite に新しい会員が作成されます。
このプロセスには API 認証情報が必要です。取得するには、ネットワーク管理パネルに移動し、Ultimate Multisite > Settings > API & Webhooks, を選択し、API Settings セクションを探します。
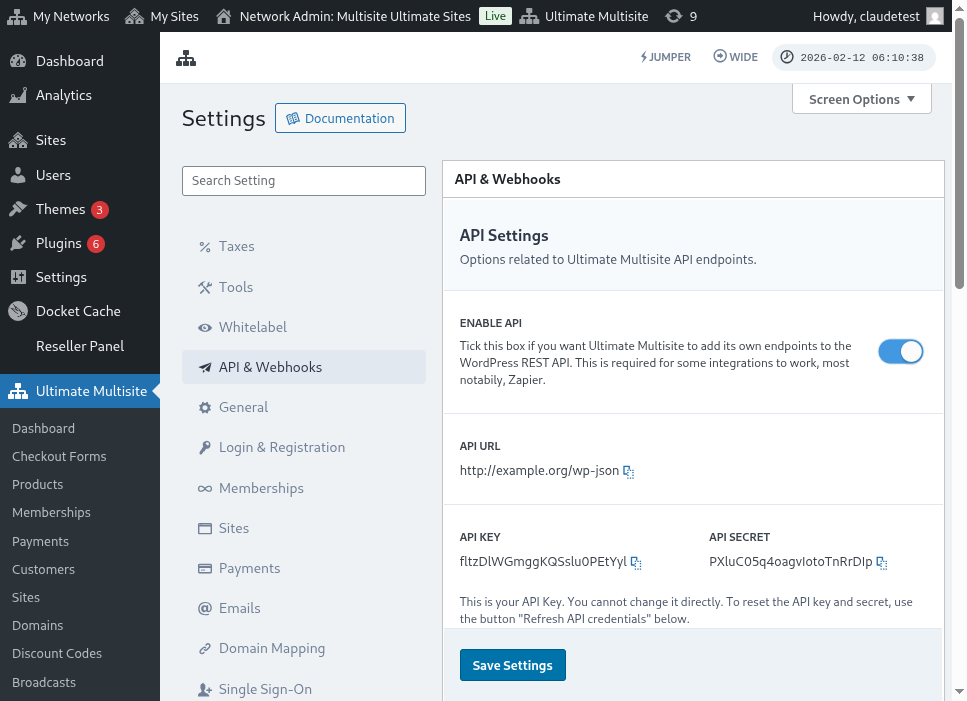
Enable API を選択し、API 認証情報を取得します。
それでは、エンドポイントを確認し、Zapierで登録アクションを作成しましょう。
エンドポイント本文パラメータ
エンドポイントに送信する必要がある最低限の情報を概観しましょう。この記事の最後に、完全な呼び出し例を示します。
カスタマー
ユーザーと Ultimate Multisite 顧客を作成するプロセスに必要な情報です:
"customer_id" : integer
ネットワークで作成された顧客IDを送信することができます。送信しない場合は、以下の情報が使用され、新しい顧客と新しい WordPress ユーザーが作成されます。ユーザーIDも顧客IDと同様に送信できます。
"customer" : { "user_id" : integer "username" : "string", "password" : "string", "email" : "string", },
会員
このオブジェクトに必要な情報は会員ステータスのみです。
"membership" { "status" : "string", // one of "pending", "active", "trialing", "expired", "on-hold", "canceled" },
製品
製品は、ネットワーク内の 1 つ以上の製品IDを配列で指定します。注意してください、このエンドポイントは製品を作成しません。製品作成エンドポイントについては、Ultimate Multisite のドキュメントを参照してください。
"products" : [1,2],
支払い
会員と同様に、ステータスのみが必要です。
"payment" { "status" : "string", // one of "pending", "completed", "refunded", "partially-refunded", "partially-paid", "failed", "canceled" },
サイト
本文を閉じるには、Site オブジェクト内にサイトの URL とタイトルが必要です。
"site" : { "site_url" : "string", "site_title" : "string" }
register エンドポイントの戻り値は、新しく作成された会員情報を含む配列になります。
Zapierでアクションを作成
この新しく、より堅牢なアカウント作成エンドポイントの導入により、Zapier で新しいアクションにアクセスできるようになります。
Zapier の新バージョンが提供するすべての機能を使いこなす方法をご存知ですか? 詳細はこちら。 (link?)
アクションの作成
Zapier で登録エンドポイントを使用する方法をより具体的に示すために、Google Forms との統合を作成しましょう。このフォームが入力され、回答シートに情報が保存されるたびに、Ultimate Multisite ネットワークに新しい会員が作成されます。
Google Forms で、ネットワークに新しい会員を作成するために必要な最小限のフィールドを持つフォームを作成します。
Zapier で新しい Zap を作成し、データが保存されているスプレッドシートを介して Google で作成したフォームを接続します。
完了です! Google Forms のフォームが Zapier と接続され、ネットワークへの統合準備が整いました。次に、Google Forms が入力されるたびにトリガーされるアクションに進みましょう。
新しい Ultimate Multisite アプリを見つけて選択します。この種の Zap では Register オプションを選択します。
After this first step, choose the account that will be connected with this Zap.
こ��れはプロセス全体で最も重要な部分です。Google Forms から送られるフィールドを、この記事の前のセクションで示した登録エンドポイントに必要な最小限のフィールドと一致させる必要があります。
この例では、ユーザー名、メールアドレス、パスワード、名前、ウェブサイトの URL のみを設定すれば十分です。残りは事前に決定されており、Google Forms で生成されるすべての会員が同じ製品とステータスのパターンに従うようになっています。
With the information set up, proceed to the final test. On the last screen you can see all the fields that will be sent to the endpoint, their respective information and the fields that will be sent empty.
新しい Zap をテストし、正常に完了するはずです。エラーが発生した場合は、すべてのフィールドが正しく送信されているか確認してください。情報量が多いため、見落としが発生することがあります。
完全なエンドポイントパラメータ
以下は、完全な呼び出し例と送信可能なすべてのフィールドの可能性です。
"customer_id" : integer, "customer" : { "user_id" : integer "username" : "string", "password" : "string", "email" : "string", }, "membership" : { "status" : "string", // one of "pending", "active", "trialing", "expired", "on-hold", "cancelled" "date_expiration" : "string", "date_trial_end" : "string", "date_activated" : "string", "date_renewed" : "string", "date_cancellation" : "string", "date_payment_plan_completed": "string", }, "products" : [1,2], "duration" : "string", "duration_unit" : "string", "discount_code" : "string", "auto_renew" : "boolean", "country" : "string", "currency" : "string", "payment" { "status" : "string", // one of "pending", "completed", "refunded", "partially-refunded", "partially-paid", "failed", "cancelled" }, "payment_method" : { "gateway" : "string", "gateway_customer_id" : "string", "gateway_subscription_id" : "string", "gateway_payment_id" : "string", }, "site" : { "site_url" : "string", "site_title" : "string", "publish" : "boolean", "template_id" : "string", }```