Ultimate Multisite Register API endpoint အကြောင်း
ဒီ tutorial မှာ Ultimate Multisite /register API endpoint ကို သုံးပြီး သင့် network မှာ customer အသစ်အတွက် onboarding လုပ်ငန်းစဉ်တစ်ခုလုံးကို ဘယ်လိုဖန်တီးမလဲ၊ Zapier နဲ့ ဘယ်လိုလုပ်မလဲဆိုတာ လေ့လာရပါမယ်။
ဒီ endpoint က POST method ကိုသုံးပြီး https://yoursite.com/wp-json/wu/v2/register URL ကနေ ခေါ်ယူရပါတယ်။ ဒီ call မှာ သင့် network အတွင��်း လုပ်ငန်းစဉ် ၄ ခု လုပ်ဆောင်ပါလိမ့်မယ်:
-
WordPress user အသစ်တစ်ယောက် ဖန်တီးမယ် သို့မဟုတ် user ID ကနေ သိရှိထားတဲ့ user ကို ရှာဖွေမယ်။
-
Ultimate Multisite မှာ Customer အသစ်တစ်ယောက် ဖန်တီးမယ် သို့မဟုတ် customer ID ကနေ သိရှိထားတဲ့ customer ကို ရှာဖွေမယ်။
-
WordPress network မှာ site အသစ်တစ်ခု ဖန်တီးမယ်။
-
နောက်ဆုံးမှာ Ultimate Multisite မှာ Membership အသစ်တစ်ခု ဖန်တီးမယ်။
ဒီလုပ်ငန်းစဉ်အတွက် သင့် API credentials လိုအပ်ပါမယ်။ ရယူဖို့ network admin panel ကိုသွားပြီး Ultimate Multisite > Settings > API & Webhooks ကို သွားကာ API Settings section ကို ရှာပါ။
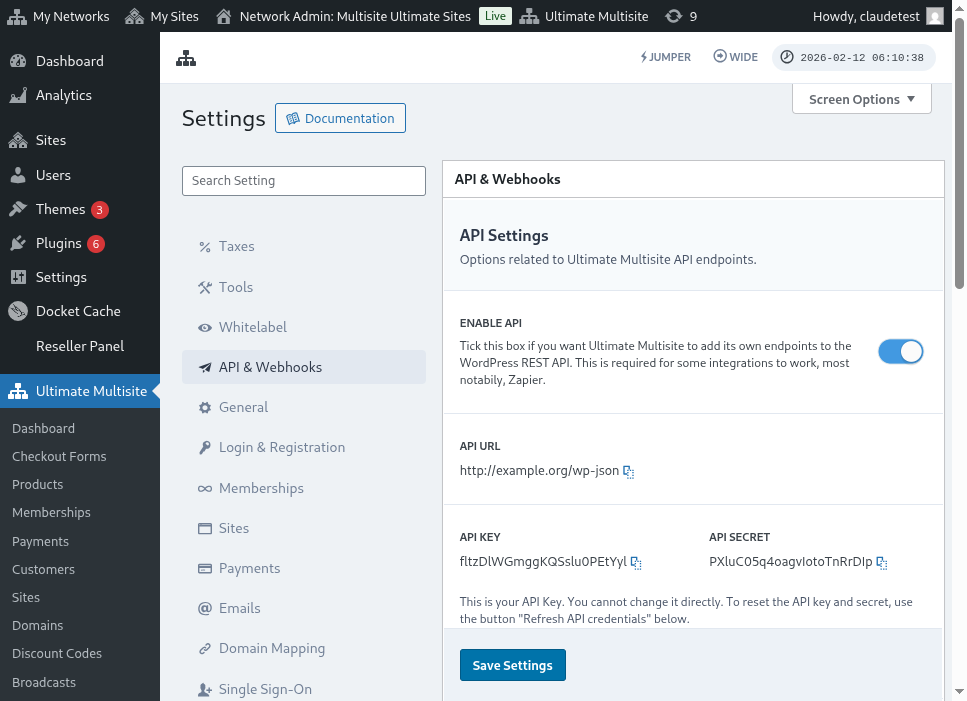
Enable API ကို ရွေးပြီး သင့် API credentials ကို ရယူပါ။
အခု endpoint ကို လေ့လာပြီး Zapier မှာ registration action တစ်ခု ဖန်တီးကြရအောင်။
Endpoint body parameters များ
Endpoint ကို ပို့ဖို့ အနည်းဆုံးလိုအပ်တဲ့ အချက်အလက်တွေကို ခြုံငုံသုံးသပ်ကြည့်ရအောင်။ ဒီဆောင်းပါးအဆုံးမှာ call အပြည့်အစုံကို တွေ့ရပါမယ်။
Customer
ဒါက User နဲ့ Ultimate Multisite Customer ဖန်တီးတဲ့ လုပ်ငန်းစဉ်အတွက် လိုအပ်တဲ့ အချက်အလက်တွေဖြစ်ပါတယ်:
"customer_id" : integer
သင့် network မှာ ဖန်တီးထားတဲ့ customer ID ကို ပို့လို့ရပါတယ်။ မပို့ရင် အောက်က အချက်အလက်တွေကို သုံးပြီး customer အသစ်နဲ့ WordPress user အသစ် ဖန်တီးပါမယ်။ user ID ကိုလည်း customer ID လိုပဲ ပို့လို့ရပါတယ်။
"customer" : { "user_id" : integer "username" : "string", "password" : "string", "email" : "string", },
Membership
ဒီ object အတွင်းမှာ Membership Status တစ်ခုတည်းပဲ လိုအပ်ပါတယ်။
"membership" { "status" : "string", // "pending", "active", "trialing", "expired", "on-hold", "canceled" ထဲက တစ်ခု },
Products
Products ကို သင့် network ရဲ့ product ID တစ်ခု သို့မဟုတ် တစ်ခုထက်ပိုတဲ့ array အဖြစ် ပေးရပါတယ်။ သတိထားရမှာက ဒီ endpoint က products မဖန်တီးပါဘူး။ product ဖန်တီးတဲ့ endpoint ကို ပိုနားလည်ဖို့ Ultimate Multisite ရဲ့ documentation ကို ကြည့်ပါ။
"products" : [1,2],
Payment
Membership လိုပဲ status တစ်ခုတည်းပဲ လိုအပ်ပါတယ်။
"payment" { "status" : "string", // "pending", "completed", "refunded", "partially-refunded", "partially-paid", "failed", "canceled" ထဲက တစ်ခု },
Site
body ကို အဆုံးသတ်ဖို့ site ရဲ့ URL နဲ့ Title လိုအပ်ပြီး နှစ်ခုလုံး Site object အတွင်းမှာ ထည့်ရပါတယ်။
"site" : { "site_url" : "string", "site_title" : "string" }
register endpoint ရဲ့ return က အသစ်ဖန်တီးထားတဲ့ membership အချက်အလက်ပါတဲ့ array တစ်ခုဖြစ်ပါမယ်။
Zapier မှာ action တစ်ခု ဖန်တီးခြင်း
ဒီ account ဖန်တီးတဲ့ endpoint အသစ်နဲ့ ပိုပြီးခိုင်မာတဲ့ version ကြောင့် Zapier မှာ action အသစ်တစ်ခုကိုလည်း သုံးနိုင်ပါပြီ။
Zapier version အသစ်ရဲ့ အကျိုးကျေးဇူးတွေကို ဘယ်လိုသုံးမလဲ သိချင်ရင် ဒီမှာ ပိုလေ့လာပါ။ (link?)
Action တစ်ခု ဖန်တီးခြင်း
Zapier နဲ့ registration endpoint ကို ဘယ်လိုသုံးမလဲဆိုတာ ပိုရှင်းအောင် ရှင်းပြဖို့ Google Forms နဲ့ integration တစ်ခု ဖန်တီးကြရအောင်။ ဒီ form ကို ဖြည့်ပြီး အချက်အလက်�တွေကို form ရဲ့ answer sheet မှာ သိမ်းတိုင်း network မှာ membership အသစ်တစ်ခု ဖန်တီးပါမယ်။
Google Forms မှာ network မှာ membership အသစ်ဖန်တီးဖို့ အနည်းဆုံးလိုအပ်တဲ့ field တွေပါတဲ့ form တစ်ခု ဖန်တီးပါ။
အခု Zapier မှာ Zap အသစ်တစ်ခု ဖန်တီးပြီး ဖန်တီးထားတဲ့ Google form ကို data သိမ်းထားတဲ့ spreadsheet ကနေ ချိတ်ဆက်ပါ။
ပြီးပါပြီ။ Google Forms form က Zapier နဲ့ ချိတ်ဆက်ပြီး network နဲ့ integrate လုပ်ဖို့ အဆင်သင့်ဖြစ်ပါပြီ။ အခု form ဖြည့်တိုင်း Google Forms က trigger လုပ်ပေးမယ့် Trigger ရဲ့ ရလဒ်ဖြစ်တဲ့ Action ကို ဆက်လုပ်ကြရအောင်။
Ultimate Multisite app အသစ်ကို ရှာပြီး ရွေးပါ။ ဒီမျိုး Zap အတွက် Register option ကို ရွေးပါ။
ဒီပထမအဆင့်ပြီးရင် ဒီ Zap နဲ့ ချိတ်ဆက်မယ့် account ကို ရွေးပါ။
ဒါက လုပ်ငန်းစဉ်တစ်ခုလုံးမှာ အရေးအကြီးဆုံး အပိုင်းဖြစ်ပါတယ်။ Google Forms ကနေ လာတဲ့ field တွေကို register endpoint အတွက် အနည်းဆုံးလိုအပ်တဲ့ field တွေနဲ့ တိုက်ဆိုင်ပေးရပါမယ်၊ ဒီဆောင်းပါးရဲ့ အရင် section မှာ ပြထားတဲ့အတိုင်းပါ။
ဒီ ဥပမာမှာ username, email, password, website ရဲ့ name နဲ့ URL တွေပဲ configure လုပ်ဖို့ လိုပါတယ်။ ကျန်တာတွေကို ကြိုတင်သတ်မှတ်ထားပြီး ဒီ Google Forms ကနေ ဖန်တီးတဲ့ membership အားလုံး product နဲ့ status pattern တူညီအောင် လုပ်ထားပါတယ်။
အချက်အလက်တွေ သတ်မှတ်ပြီးရင် နောက်ဆုံး test ကို ဆက်လုပ်ပါ။ နောက်ဆုံး screen မှာ endpoint ကို ပို့မယ့် field အားလုံး၊ သက်ဆိုင်ရာ အချက်အလက်တွေနဲ့ အလွတ်ပို့မယ့် field တွေကို မြင်ရပါမယ်။
သင့် Zap အသစ်ကို test လုပ်ပြီး အောင်မြင်စွာ ပြီးဆုံးသင့်ပါတယ်။ error တစ်ခုခု ဖြစ်ရင် field အားလုံးကို စစ်ပြီး မှန်မှန်ကန်ကန် ပို့နေလားကြည့်ပါ။ အချက်အလက်အများကြီး ရှိတာကြောင့် အချို့အရာတွေ လွတ်သွားနိုင်ပါတယ်။
Endpoint parameter အပြည့်အစုံ
ဒါက call အပြည့်အစုံနဲ့ ပို့လို့ရတဲ့ field ဖြစ်နိုင်ချေ အားလုံးဖြစ်ပါတ��ယ်။
"customer_id" : integer, "customer" : { "user_id" : integer "username" : "string", "password" : "string", "email" : "string", }, "membership" : { "status" : "string", // "pending", "active", "trialing", "expired", "on-hold", "cancelled" ထဲက တစ်ခု "date_expiration" : "string", "date_trial_end" : "string", "date_activated" : "string", "date_renewed" : "string", "date_cancellation" : "string", "date_payment_plan_completed": "string", }, "products" : [1,2], "duration" : "string", "duration_unit" : "string", "discount_code" : "string", "auto_renew" : "boolean", "country" : "string", "currency" : "string", "payment" { "status" : "string", // "pending", "completed", "refunded", "partially-refunded", "partially-paid", "failed", "cancelled" ထဲက တစ်ခု }, "payment_method" : { "gateway" : "string", "gateway_customer_id" : "string", "gateway_subscription_id" : "string", "gateway_payment_id" : "string", }, "site" : { "site_url" : "string", "site_title" : "string", "publish" : "boolean", "template_id" : "string", }