Ultimate Multisite Register API endpoint
આ ટ્યુટોરિયલમાં, તમે શીખશો કે Ultimate Multisite /register API endpoint નો ઉપયોગ કરીને તમારા network માં નવા ગ્રાહક માટે સંપૂર્ણ onboarding પ્રક્રિયા કેવી રીતે બનાવવી અને Zapier સાથે આ કેવી રીતે કરવું.
આ endpoint POST method નો ઉપયોગ કરે છે અને URL https://yoursite.com/wp-json/wu/v2/register દ્વારા call થાય છે. આ call માં, તમારા network માં 4 પ્રક્રિયાઓ execute થશે:
-
નવો WordPress user અથવા user ID દ્�વારા તેની ઓળખ બનાવવામાં આવશે.
-
Ultimate Multisite માં નવો Customer અથવા customer ID દ્વારા તેની ઓળખ બનાવવામાં આવશે.
-
WordPress network પર નવી site બનાવવામાં આવશે.
-
અંતે, Ultimate Multisite માં નવી Membership બનાવવામાં આવશે.
આ પ્રક્રિયા માટે, તમારે તમારા API credentials ની જરૂર પડશે. તે મેળવવા માટે, તમારા network admin panel પર જાઓ, Ultimate Multisite > Settings > API & Webhooks પર navigate કરો, અને API Settings section શોધો.
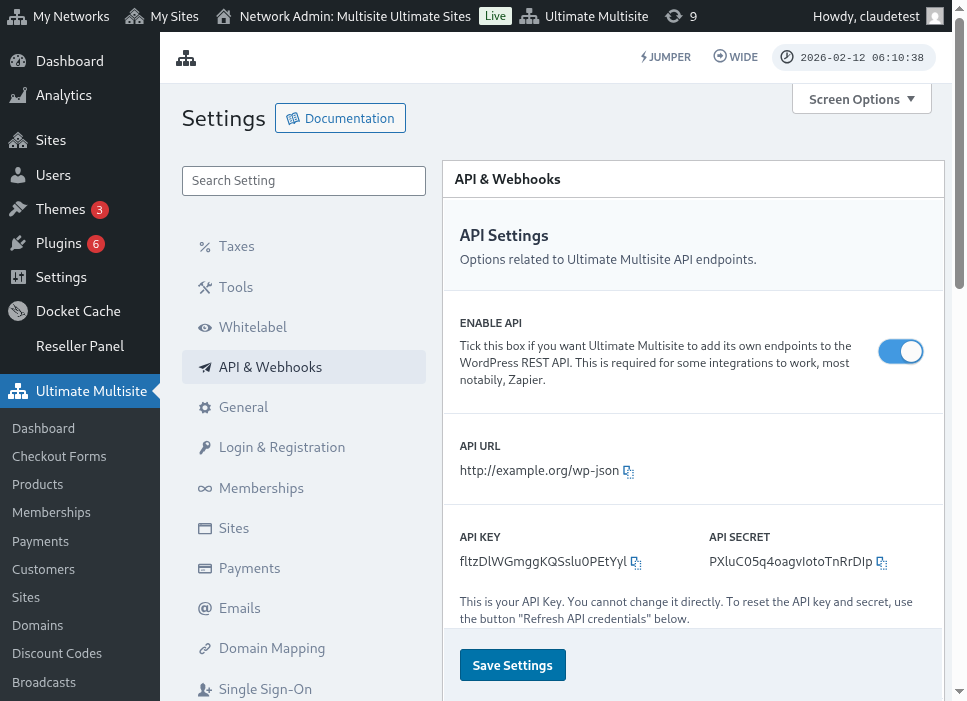
Enable API પસંદ કરો અને તમારા API credentials મેળવો.
હવે, ચાલો endpoint ની શોધખોળ કરીએ અને પછી Zapier માં registration action બનાવીએ.
Endpoint body parameters
ચાલો endpoint ને મોકલવા માટે જરૂરી minimum માહિતીનો overview જોઈએ. આ article ના અંતે, તમને સંપૂર્ણ call મળશે.
Customer
User અને Ultimate Multisite Customer બનાવવાની પ્રક્રિયા માટે આ માહિતી જરૂરી છે:
"customer_id" : integer
તમારા network માં બનાવેલ customer ID મોકલવું શક્ય છે. જો submit ન કરવામાં આવે, તો નીચેની માહિતીનો ઉપયોગ નવો customer અને નવો WordPress user બનાવવા માટે થશે. Customer ID ની જેમ user ID પણ મોકલી શકાય છે.
"customer" : { "user_id" : integer "username" : "string", "password" : "string", "email" : "string", },
Membership
આ object ની અંદર આપણને ફક્ત Membership Status ની જરૂર છે.
"membership" { "status" : "string", // one of "pending", "active", "trialing", "expired", "on-hold", "canceled" },
Products
Products ને તમારા network માંથી 1 અથવા વધુ product ID સાથેનો array આપવામાં આવે છે. ધ્યાન રાખો, આ endpoint products બનાવતું નથી. Product creation endpoint ને વધુ સારી રીતે સમજવા માટે Ultimate Multisite ની documentation �તપાસો.
"products" : [1,2],
Payment
Membership ની જેમ, આપણને ફક્ત status ની જરૂર છે.
"payment" { "status" : "string", // one of "pending", "completed", "refunded", "partially-refunded", "partially-paid", "failed", "canceled" },
Site
અને body પૂર્ણ કરવા માટે આપણને site નું URL અને Title જોઈએ, બંને Site object ની અંદર.
"site" : { "site_url" : "string", "site_title" : "string" }
Register endpoint નું return નવી બનાવેલ membership માહિતી સાથેનો array હશે.
Zapier માં action બનાવવું
આ નવા અને વધુ robust account creation endpoint ના introduction સાથે તમને Zapier માં નવા action ની પણ access મળશે.
શું તમે જાણો છો કે Zapier ના નવા version ની બધી સુવિધાઓ કેવી રીતે વાપરવી? અહીં વધુ જાણો. (link?)
Action બનાવવું
Zapier સાથે registration endpoint નો ઉપયોગ કેવી રીતે કરવો તે વધુ સારી રીતે સમજાવવા માટે, ચાલો Google Forms સાથે integration બનાવીએ. જ્યારે પણ આ form ભરવામાં આવે અને માહિતી form ના answer sheet માં save થાય, ત્યારે Ultimate Multisite network માં નવી membership બનાવવામાં આવશે.
Google Forms માં, network માં નવી membership બનાવવા માટે જરૂરી minimum fields સાથે form બનાવો.
હવે Zapier માં, નવો Zap બનાવો અને બનાવેલ Google form ને તે spreadsheet દ્વારા connect કરો જ્યાં data save થાય છે.
થઈ ગયું! Google Forms form Zapier સાથે connect થઈ ગયું છે અને network સાથે integrate થવા માટે તૈયાર છે. હવે ચાલો તે Action પર આગળ વધીએ જે Google Forms દ્વારા દર વખતે ભરાય ત્યારે trigger થતા Trigger નું પરિણામ હશે.
નવી Ultimate Multisite app શોધો અને તેને select કરો. આ પ્રકારના Zap માટે Register option પસંદ કરો.
આ પહેલા step પછી, આ Zap સાથે connect થનારું account પસંદ કરો.
આ આખી પ્રક્રિયાનો સૌથી sensitive ભાગ છે. આપણે Google Forms માંથી આવેલા fields ને register endpoint માટે જરૂરી minimum fields સાથે match કરવાની જરૂર છે, જેમ આ article ના પાછલા section માં બતાવ્યું છે.
આ ઉદાહરણમાં, આપણે ફક્ત username, email, password, name અને website નું URL configure કરવાની જરૂર છે. બાકીનું pre-determined રાખવામાં આવ્યું છે જેથી આ Google Forms પર generate થતી બધી memberships એક જ product અને status pattern ને follow કરે.
માહિતી setup થઈ ગયા પછી, final test તરફ આગળ વધો. છેલ્લી screen પર તમે endpoint ને મોકલવામાં આવનારા બધા fields, તેમની respective માહિતી અને empty મોકલવામાં આવનારા fields જોઈ શકો છો.
તમારા નવા Zap ને test કરો અને તે successfully complete થવું જોઈએ. જો કોઈ error આવે, તો બધા fields તપાસો અને જુઓ કે તે યોગ્ય રીતે મોકલવામાં આવી રહ્યા છે કે નહીં. ઘણી બધી માહિતી હોવાથી, કેટલીક વસ્તુઓ ધ્યાન બહાર જઈ શકે છે.
Complete endpoint parameters
અહીં સંપૂર્ણ call અને મોકલી શકાય તેવા બધા fields ની possibilities છે.
"customer_id" : integer, "customer" : { "user_id" : integer "username" : "string", "password" : "string", "email" : "string", }, "membership" : { "status" : "string", // one of "pending", "active", "trialing", "expired", "on-hold", "cancelled" "date_expiration" : "string", "date_trial_end" : "string", "date_activated" : "string", "date_renewed" : "string", "date_cancellation" : "string", "date_payment_plan_completed": "string", }, "products" : [1,2], "duration" : "string", "duration_unit" : "string", "discount_code" : "string", "auto_renew" : "boolean", "country" : "string", "currency" : "string", "payment" { "status" : "string", // one of "pending", "completed", "refunded", "partially-refunded", "partially-paid", "failed", "cancelled" }, "payment_method" : { "gateway" : "string", "gateway_customer_id" : "string", "gateway_subscription_id" : "string", "gateway_payment_id" : "string", }, "site" : { "site_url" : "string", "site_title" : "string", "publish" : "boolean", "template_id" : "string", }