Ultimate Multisite 注册 API 端点
在本教程中,您将学习如何使用 Ultimate Multisite /register API 端点为网络中的新客户创建完整的入职流程,并了解如何使用 Zapier 实现此功能。
该端点使用 POST 方法,并通过 URL https://yoursite.com/wp-json/wu/v2/register 调用。在此调用中,网络内将执行 4 个流程:
- 将创建一个新的 WordPress 用户,或通过用户 ID 识别现有用户。
- 将创建一个新的 Ultimate Multisite 客户,或通过客户 ID 识别现有客户。
- 将在 WordPress 网络上创建一个新站点。
- 最终,将在 Ultimate Multisite 中创建一个新的会员。
要完成此流程,您需要 API 凭据。获取凭据,请前往网络管理员面板,导航至 Ultimate Multisite > Settings > API & Webhooks,并查找 API 设置部分。
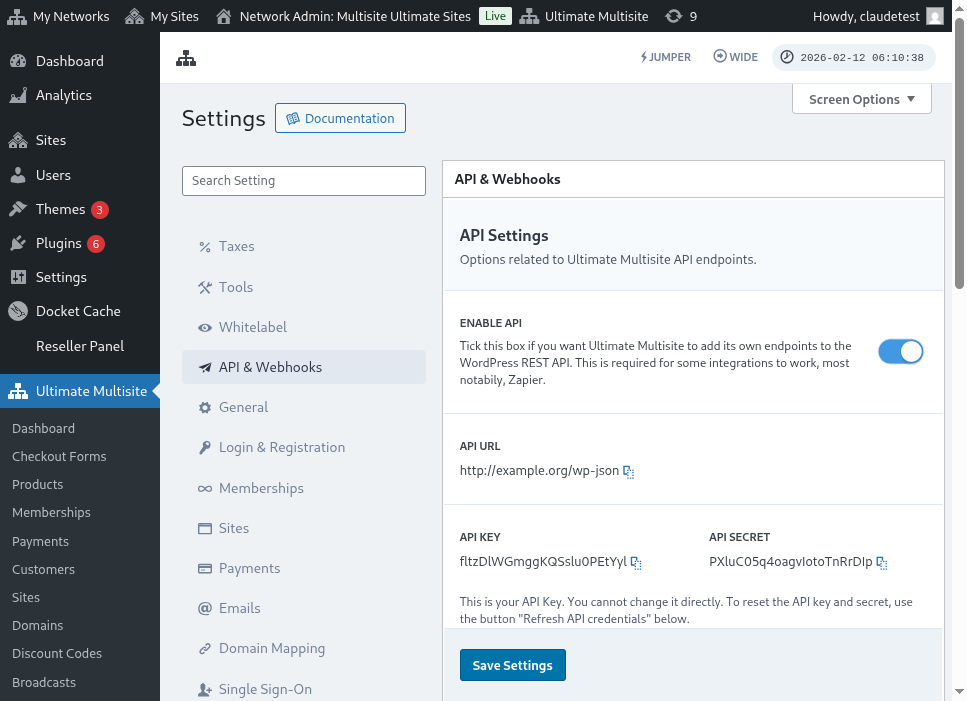 选择 Enable API 并获取您的 API 凭据。
现在,让我们先了解该端点,然后在 Zapier 中创建注册操作。
端点请求体参数
让我们先了解发送到端点所需的最小信息。本文末尾将给出完整调用示例。
客户
以下信息是创建用户和 Ultimate Multisite 客户所必需的:
"customer_id" : integer
可以发送在网络中创建的客户 ID。如果未提交,则以下信息将用于创建新客户和新的 WordPress 用户。用户 ID 也可以以与客户 ID 相同的方式发送。
"customer" : { "user_id" : integer "username" : "string", "password" : "string", "email" : "string", },
会员
此对象中唯一需�要的信息是会员状态。
"membership" { "status" : "string", // one of "pending", "active", "trialing", "expired", "on-hold", "canceled" },
产品
产品以包含 1 个或多个网络中产品 ID 的数组形式提供。请注意,该端点不会创建产品。请查看 Ultimate Multisite 文档以更好地了解产品创建端点。
"products" : [1,2],
支付
与会员类似,我们只需要状态。
"payment" { "status" : "string", // one of "pending", "completed", "refunded", "partially-refunded", "partially-paid", "failed", "canceled" },
站点
最后,正文中需要站点的 URL 和标题,均包含在 Site 对象中。
"site" : { "site_url" : "string", "site_title" : "string" }
注册端点的返回将是包含新创建会员信息的数组。
在 Zapier 中创建操作
随着此新且更强大的账户创建端点的推出,您还将获得 Zapier 中的新操作。
您是否了解如何使用并享受 Zapier 新版本提供的所有功能?在此了解更多信息。(链接?)
创建操作
为更好地说明如何在 Zapier 中使用注册端点,让我们创建一个与 Google 表单的集成。每当此表单被填写并将信息保存在表单答案表中时,Ultimate Multisite 网络中将创建一个新会员。
在 Google 表单中,创建一个包含创建网络中新会员所需最小字段的表单。
现在在 Zapier 中,创建一个新的 Zap 并通过保存数据的电子表格连接已创建的 Google 表单。
完成!Google 表单已与 Zapier 连接并准备好与网络集成。现在让我们进入每次 Google 表单填写时触发的触发器所产生的操作。
找到新的 Ultimate Multisite 应用并选择它。对于此类 Zap,选择 Register 选项。
完成此第一步后,选择将与此 Zap 连接的账户。
After this first step, choose the account that will be connected with this Zap.
这是整个流程中最敏感的部分。我们需要将来自 Google 表单的字段与注册端点所需的最小字段匹配,如本文前面所示。
在此示例中,我们仅需配置用户名、电子邮件、密码、网站名称和 URL。其余字段保持预设,以便所有通过此 Google 表单生成的会员遵循相同的产品和状态模式。
设置完信息后,进行最终测试。在最后一屏中,您可以看到将发送到端点的所有字段、各自的信息以及将为空的字段。
With the information set up, proceed to the final test. On the last screen you can see all the fields that will be sent to the endpoint, their respective information and the fields that will be sent empty.
测试您的新 Zap,应该能成功完成。如果出现任何错误,请检查所有字段是否已正确发送。由于信息量大,某些细节可能被忽略。
完整端点参数
以下是完整调用以及可发送的所有字段可能性。
"customer_id" : integer, "customer" : { "user_id" : integer "username" : "string", "password" : "string", "email" : "string", }, "membership" : { "status" : "string", // one of "pending", "active", "trialing", "expired", "on-hold", "cancelled" "date_expiration" : "string", "date_trial_end" : "string", "date_activated" : "string", "date_renewed" : "string", "date_cancellation" : "string", "date_payment_plan_completed": "string", }, "products" : [1,2], "duration" : "string", "duration_unit" : "string", "discount_code" : "string", "auto_renew" : "boolean", "country" : "string", "currency" : "string", "payment" { "status" : "string", // one of "pending", "completed", "refunded", "partially-refunded", "partially-paid", "failed", "cancelled" }, "payment_method" : { "gateway" : "string", "gateway_customer_id" : "string", "gateway_subscription_id" : "string", "gateway_payment_id" : "string", }, "site" : { "site_url" : "string", "site_title" : "string", "publish" : "boolean", "template_id" : "string", }