Ultimate Multisite Register API endpoint
या ट्युटोरियलमध्ये, तुम्ही Ultimate Multisite /register API endpoint वापरून तुमच्या network मध्ये नवीन ग्राहकांसाठी संपूर्ण onboarding प्रक्रिया कशी तयार करायची आणि Zapier सोबत हे कसे करायचे ते शिकाल.
हा endpoint POST method वापरतो आणि https://yoursite.com/wp-json/wu/v2/register या URL द्वारे call केला जातो. या call मध्ये, तुमच्या network मध्ये 4 प्रक्रिया पार पाडल्या जातील:
-
एक नवीन WordPress user किंवा user ID द्वारे त्याची ओळख तयार केली जाईल.
-
Ultimate Multisite मध्ये एक नवीन Customer किंवा customer ID द्वारे त्याची ओळख तयार केली जाईल.
-
WordPress network वर एक नवीन site तयार केली जाईल.
-
शेवटी, Ultimate Multisite मध्ये एक नवीन Membership तयार केली जाईल.
या प्रक्रियेसाठी, तुम्हाला तुमच्या API credentials ची आवश्यकता असेल. ते मिळवण्यासाठी, तुमच्या network admin panel वर जा, Ultimate Multisite > Settings > API & Webhooks वर navigate करा आणि API Settings section शोधा.
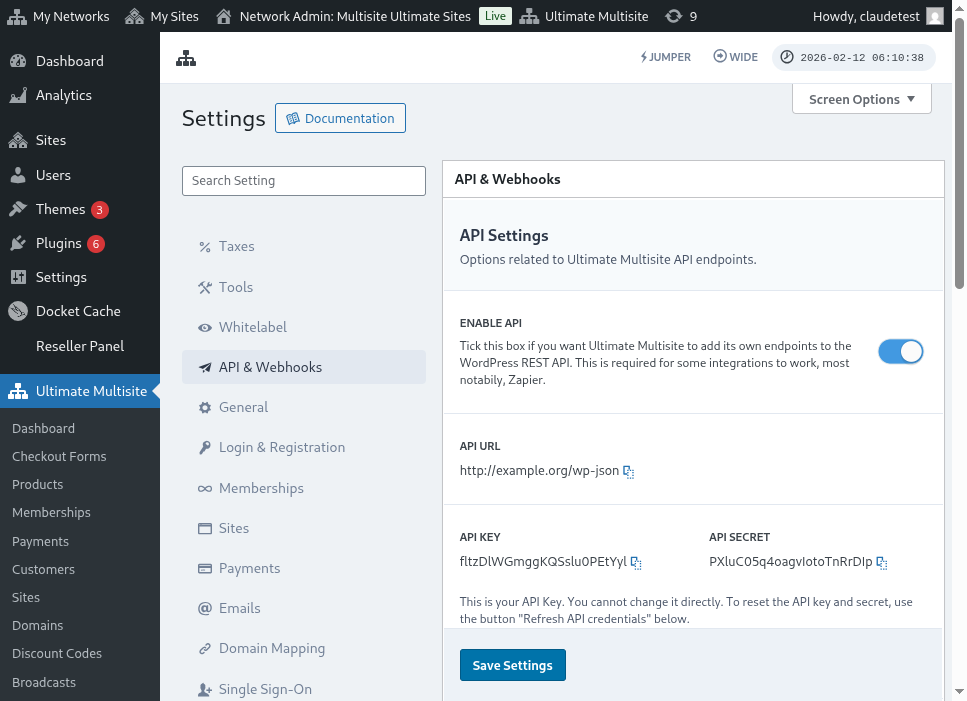
Enable API निवडा आणि तुमचे API credentials मिळवा.
आता, endpoint बद्दल जाणून घेऊया आणि नंतर Zapier मध्ये एक registration action तयार करूया.
Endpoint body parameters
Endpoint ला पाठवण्यासाठी आवश्यक असलेल्या किमान माहितीचा आढावा घेऊया. ��या लेखाच्या शेवटी, तुम्हाला संपूर्ण call मिळेल.
Customer
User आणि Ultimate Multisite Customer तयार करण्याच्या प्रक्रियेसाठी आवश्यक असलेली माहिती ही आहे:
"customer_id" : integer
तुमच्या network मध्ये तयार केलेला customer ID पाठवणे शक्य आहे. जर पाठवला नाही, तर खालील माहिती वापरून एक नवीन customer आणि नवीन WordPress user तयार केला जाईल. Customer ID प्रमाणेच user ID देखील पाठवता येतो.
"customer" : { "user_id" : integer "username" : "string", "password" : "string", "email" : "string", },
Membership
या object मध्ये फक्त Membership Status ची माहिती आवश्यक आहे.
"membership" { "status" : "string", // one of "pending", "active", "trialing", "expired", "on-hold", "canceled" },
Products
Products हे तुमच्या network मधील 1 किंवा अधिक product ID असलेला array म्हणून दिले जातात. लक्षात ठेवा, हा endpoint products तयार करत नाही. Product creation endpoint अधिक चांगल्या प्रकारे समजून घेण्यासाठी Ultimate Multisite चे documentation पहा.
"products" : [1,2],
Payment
Membership प्रमाणेच, आपल्याला फक्त status आवश्यक आहे.
"payment" { "status" : "string", // one of "pending", "completed", "refunded", "partially-refunded", "partially-paid", "failed", "canceled" },
Site
आणि body पूर्ण करण्यासाठी आपल्याला site चा URL आणि Title आवश्यक आहे, दोन्ही Site object मध्ये.
"site" : { "site_url" : "string", "site_title" : "string" }
Register endpoint चा return नवीन तयार केलेल्या membership माहितीसह एक array असेल.
Zapier मध्ये action तयार करणे
या नवीन आणि अधिक मजबूत account creation endpoint च्या परिचयासह तुम्हाला Zapier मध्ये एक नवीन action देखील मिळेल.
Zapier च्या नवीन version मध्ये सर्व काही कसे वापरायचे आणि त्याचा आनंद कसा घ्यायचा हे तुम्हाला माहीत आहे का? येथे अधिक जाणून घ्या. (link?)
Action तयार करणे
Zapier सोबत registration endpoint कसे वापरायचे हे अधिक चांगल्या प्रकारे समजावून सांगण्यासाठी, Google Forms सोबत एक integration तयार करूया. प्रत्येक वेळी हा form भरला जाईल आणि माहिती form च्या answer sheet मध्ये save केली जाईल, तेव्हा Ultimate Multisite network मध्ये एक नवीन membership तयार होईल.
Google Forms मध्ये, network मध्ये नवीन membership तयार करण्यासाठी आवश्यक किमान fields सह एक form तयार करा.
आता Zapier मध्ये, एक नवीन Zap तयार करा आणि data save होणाऱ्या spreadsheet द्वारे Google मध्ये तयार केलेला form connect करा.
झालं! Google Forms form Zapier शी connect झाला आणि network सोबत integrate होण्यासाठी तयार आहे. आता प्रत्येक वेळी Google Forms भरल्यावर trigger होणाऱ्या Action कडे जाऊया.
नवीन Ultimate Multisite app शोधा आणि निवडा. या प्रकारच्या Zap साठी Register option निवडा.
या पहिल्या step नंतर, या Zap शी connect होणारे account निवडा.
हा संपूर्ण प्रक्रियेचा सर्वात महत्त्वाचा भाग आहे. या लेखाच्या मागील section मध्ये दाखवल्याप्रमाणे, Google Forms मधून आलेल्या fields ला register endpoint साठी आवश्यक किमान fields शी match करणे आवश्यक आहे.
या उदाहरणात, आपल्याला फक्त username, email, password, name आणि website चा URL configure करायचा आहे. बाकीचे पूर्व-निर्धारित ठेवले आहे जेणेकरून या Google Forms वर तयार होणाऱ्या सर्व memberships समान product आणि status pattern चे पालन करतील.
माहिती set up केल्यावर, अंतिम test कडे जा. शेवटच्या screen वर तुम्ही endpoint ला पाठवले जाणारे सर्व fields, त्यांची संबंधित माहिती आणि रिक्त पाठवले जाणारे fields पाहू शकता.
तुमचा नवीन Zap test करा आणि तो यशस्वीरित्��या पूर्ण झाला पाहिजे. जर काही error आली, तर सर्व fields तपासा आणि ते योग्यरित्या पाठवले जात आहेत का ते पहा. खूप माहिती असल्यामुळे, काही गोष्टी नजरेतून सुटू शकतात.
संपूर्ण endpoint parameters
येथे संपूर्ण call आणि पाठवता येणाऱ्या fields च्या सर्व शक्यता आहेत.
"customer_id" : integer, "customer" : { "user_id" : integer "username" : "string", "password" : "string", "email" : "string", }, "membership" : { "status" : "string", // one of "pending", "active", "trialing", "expired", "on-hold", "cancelled" "date_expiration" : "string", "date_trial_end" : "string", "date_activated" : "string", "date_renewed" : "string", "date_cancellation" : "string", "date_payment_plan_completed": "string", }, "products" : [1,2], "duration" : "string", "duration_unit" : "string", "discount_code" : "string", "auto_renew" : "boolean", "country" : "string", "currency" : "string", "payment" { "status" : "string", // one of "pending", "completed", "refunded", "partially-refunded", "partially-paid", "failed", "cancelled" }, "payment_method" : { "gateway" : "string", "gateway_customer_id" : "string", "gateway_subscription_id" : "string", "gateway_payment_id" : "string", }, "site" : { "site_url" : "string", "site_title" : "string", "publish" : "boolean", "template_id" : "string", }