Ultimate Multisite Register API endpoint
ఈ ట్యుటోరియల్లో, మీ నెట్వర్క్లో కొత్త కస్టమర్ కోసం మొత్తం onboarding ప్రక్రియను సృష్టించడానికి Ultimate Multisite /register API endpoint ను ఎలా ఉపయోగించాలో మరియు Zapier తో దీన్ని ఎలా చేయాలో మీరు నేర్చుకుంటారు.
ఈ endpoint POST method ను ఉపయోగిస్తుంది మరియు https://yoursite.com/wp-json/wu/v2/register URL ద్వారా call చేయబడుతుంది. ఈ call లో, మీ నెట్వర్క్లో 4 ప్రక్రియలు అమలు చేయబడతాయి:
-
కొత్త WordPress user లేదా user ID ద్వారా వారి గుర్తింపు సృష్టించబడుతుంది.
-
Ultimate Multisite లో కొత్త Customer లేదా customer ID ద్వారా వారి గుర్తింపు సృష్టించబడుతుంది.
-
WordPress నెట్వర్క్లో కొత్త సైట్ సృష్టించబడుతుంది.
-
చివరిగా, Ultimate Multisite లో కొత్త Membership సృష్టించబడుతుంది.
ఈ ప్రక్రియ కోసం, మీకు మీ API credentials అవసరం. వాటిని పొందడానికి, మీ network admin panel కి వెళ్ళి, Ultimate Multisite > Settings > API & Webhooks కి navigate చేసి, API Settings section కోసం చూడండి.
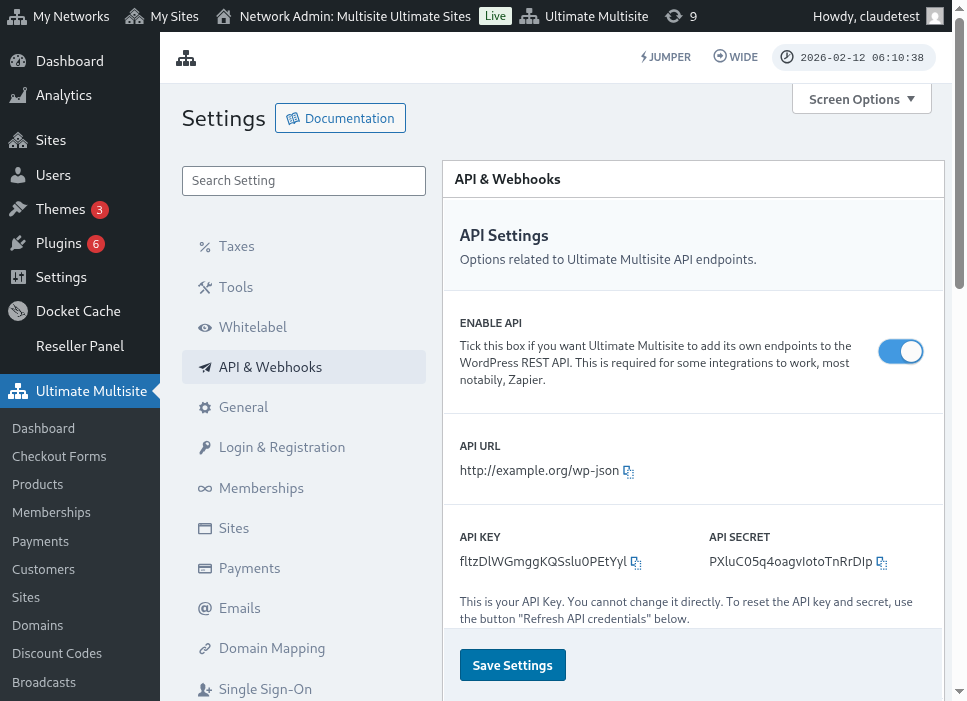
Enable API ని ఎంచుకుని మీ API credentials పొందండి.
ఇప్పుడు, endpoint ను అన్వేషించి, తర్వాత Zapier లో registration action సృష్టిద్దాం.
Endpoint body parameters
Endpoint కి పంపవలసి�న కనీస సమాచారం గురించి ఒక overview చూద్దాం. ఈ ఆర్టికల్ చివరలో, మీకు పూర్తి call కనిపిస్తుంది.
Customer
User మరియు Ultimate Multisite Customer సృష్టించే ప్రక్రియకు అవసరమైన సమాచారం ఇది:
"customer_id" : integer
మీ నెట్వర్క్లో సృష్టించిన customer ID ని పంపడం సాధ్యమే. సమర్పించకపోతే, కొత్త customer మరియు కొత్త WordPress user సృష్టించడానికి క్రింది సమాచారం ఉపయోగించబడుతుంది. customer ID లాగే user ID కూడా పంపవచ్చు.
"customer" : { "user_id" : integer "username" : "string", "password" : "string", "email" : "string", },
Membership
ఈ object లో మనకు అవసరమైన ఏకైక సమాచారం Membership Status.
"membership" { "status" : "string", // "pending", "active", "trialing", "expired", "on-hold", "canceled" లో ఒకటి },
Products
Products మీ నెట్వర్క్ నుండి 1 లేదా అంతకంటే ఎక్కువ product ID లతో array గా ఇవ్వబడతాయి. గమనించండి, ఈ endpoint products సృష్టించదు. Product creation endpoint గురించి బాగా అర్థం చేసుకోవడానికి Ultimate Multisite documentation చూడండి.
"products" : [1,2],
Payment
Membership లాగే, మనకు status మాత్రమే అవసరం.
"payment" { "status" : "string", // "pending", "completed", "refunded", "partially-refunded", "partially-paid", "failed", "canceled" లో ఒకటి },
Site
Body ను పూర్తి చేయడానికి మనకు సైట్ యొక్క URL మరియు Title అవసరం, రెండూ Site object లో ఉంటాయి.
"site" : { "site_url" : "string", "site_title" : "string" }
Register endpoint యొక్క return కొత్తగా సృష్టించిన membership సమాచారంతో ఒక array అవుతుంది.
Zapier లో action సృష్టించడం
ఈ కొత్త మరియు మరింత robust account creation endpoint పరిచయంతో మీరు Zapier లో కొత్త action ని కూడా access చేయవచ్చు.
Zapier యొక్క కొత్త version అందించే అన్నింటినీ ఎలా ఉపయోగించాలో మరియు ఆనందించాలో మీకు తెలుసా? ఇక్కడ మరింత తెలుసుకోండి. (link?)
Action సృష్టించడం
Zapier తో registration endpoint ను ఎలా ఉపయోగించాలో బాగా వివరించడానికి, Google Forms తో integration సృష్టిద్దాం. ఈ form నింపబడి, సమాచారం form యొక్క answer sheet లో save అయిన ప్రతిసారి, Ultimate Multisite నెట్వర్క్లో కొత్త membership సృష్టించబడుతుంది.
Google Forms లో, నెట్వర్క్లో కొత్త membership సృష్టించడానికి అవసరమైన కనీస fields తో form చేయండి.
ఇప్పుడు Zapier లో, కొత్త Zap చేసి, data save అయ్యే spreadsheet ద్వారా Google లో సృష్టించిన form ను connect చేయండి.
అయిపోయింది! Google Forms form Zapier తో connect అయింది మరియు నెట్వర్క్తో integrate చేయడానికి ready గా ఉంది. ఇప్పుడు Google Forms నింపబడిన ప్రతిసారి trigger అయ్యే Trigger ఫలితంగా వచ్చే Action కి వెళ్దాం.
కొత్త Ultimate Multisite app ను గుర్తించి ఎంచుకోండి. ఈ రకమైన Zap కోసం Register option ఎంచుకోండి.
ఈ మొదటి step తర్వాత, ఈ Zap తో connect అయ్యే account ఎంచుకోండి.
ఇది మొత్తం ప్రక్రియలో అత్యంత సున్నితమైన భాగం. ఈ ఆర్టికల్ యొక్క మునుపటి section లో చూపించినట్లుగా, Google Forms నుండి వచ్చిన fields ను register endpoint కు అవసరమైన కనీస fields తో match చేయాలి.
ఈ ఉదాహరణలో, మనం username, email, password, పేరు మరియు వెబ్సైట్ URL ను మాత్రమే configure చేయాలి. మిగిలినవి ముందుగా నిర్ణయించబడ్డాయి, తద్వారా ఈ Google Forms లో generate అయిన అన్ని memberships అదే product మరియు status pattern ను అనుసరిస్తాయి.
సమాచారం setup అయిన తర్వాత, final test కి proceed అవ్వండి. చివరి screen లో endpoint కి పంపబడే అన్ని fields, వాటి సంబంధిత సమాచారం మరియు empty గా పంపబడే fields చూడవచ్చు.
మీ కొత్త Zap ను test చేయండి మరియు అది విజయవంతంగ��ా complete అవ్వాలి. ఏదైనా error సంభవిస్తే, అన్ని fields మరియు అవి సరిగ్గా పంపబడుతున్నాయా అని check చేయండి. చాలా సమాచారం ఉన్నందున, కొన్ని విషయాలు గమనించబడకపోవచ్చు.
Complete endpoint parameters
ఇక్కడ complete call మరియు పంపగల అన్ని fields యొక్క possibilities ఉన్నాయి.
"customer_id" : integer, "customer" : { "user_id" : integer "username" : "string", "password" : "string", "email" : "string", }, "membership" : { "status" : "string", // "pending", "active", "trialing", "expired", "on-hold", "cancelled" లో ఒకటి "date_expiration" : "string", "date_trial_end" : "string", "date_activated" : "string", "date_renewed" : "string", "date_cancellation" : "string", "date_payment_plan_completed": "string", }, "products" : [1,2], "duration" : "string", "duration_unit" : "string", "discount_code" : "string", "auto_renew" : "boolean", "country" : "string", "currency" : "string", "payment" { "status" : "string", // "pending", "completed", "refunded", "partially-refunded", "partially-paid", "failed", "cancelled" లో ఒకటి }, "payment_method" : { "gateway" : "string", "gateway_customer_id" : "string", "gateway_subscription_id" : "string", "gateway_payment_id" : "string", }, "site" : { "site_url" : "string", "site_title" : "string", "publish" : "boolean", "template_id" : "string", }