Ultimate Multisite Register API endpoint
इस ट्यूटोरियल में, आप सीखेंगे कि Ultimate Multisite के /register API endpoint का उपयोग करके अपने network में नए customer के लिए पूरी onboarding प्रक्रिया कैसे बनाएं और इसे Zapier के साथ कैसे करें।
यह endpoint POST method का उपयोग करता है और इसे URL https://yoursite.com/wp-json/wu/v2/register से call किया जाता है। इस call में, आपके network में 4 प्रक्रियाएं execute होंगी:
-
एक नया WordPress user बनाया जाएगा या user ID के माध�्यम से उसकी पहचान की जाएगी।
-
Ultimate Multisite में एक नया Customer बनाया जाएगा या customer ID के माध्यम से उसकी पहचान की जाएगी।
-
WordPress network पर एक नई site बनाई जाएगी।
-
अंत में, Ultimate Multisite में एक नई Membership बनाई जाएगी।
इस प्रक्रिया के लिए, आपको अपने API credentials की आवश्यकता होगी। इन्हें प्राप्त करने के लिए, अपने network admin panel में जाएं, Ultimate Multisite > Settings > API & Webhooks पर navigate करें, और API Settings section खोजें।
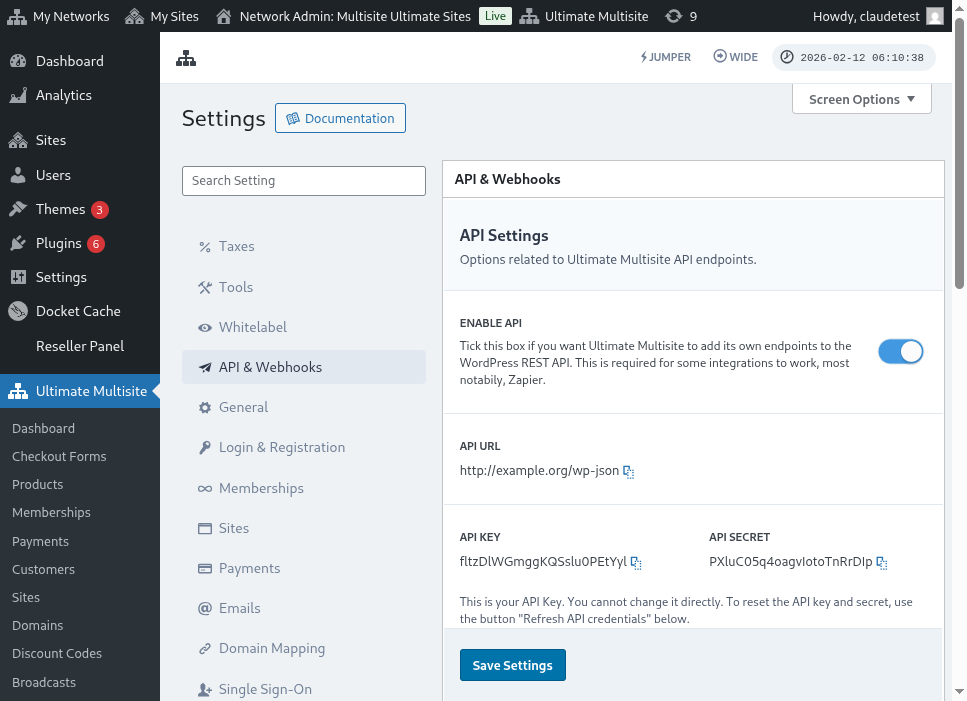
Enable API चुनें और अपने API credentials प्राप्त करें।
अब, आइए endpoint को समझें और फिर Zapier में एक registration action बनाएं।
Endpoint body parameters
आइए उस न्यूनतम जानकारी का overview देखें जो हमें endpoint को भेजनी होगी। इस article के अंत में, आपको पूरी call मिलेगी।
Customer
यह वह जानकारी है जो User और Ultimate Multisite Customer बनाने की प्रक्रिया के लिए आवश्यक है:
"customer_id" : integer
आपके network में बनाए गए customer ID को भेजना संभव है। यदि नहीं भेजा जाता, तो नीचे दी गई जानकारी का उपयोग एक नया customer और एक नया WordPress user बनाने के लिए किया जाएगा। user ID को भी customer ID की तरह ही भेजा जा सकता है।
"customer" : { "user_id" : integer "username" : "string", "password" : "string", "email" : "string", },
Membership
इस object के अंदर हमें केवल Membership Status की जानकारी चाहिए।
"membership" { "status" : "string", // "pending", "active", "trialing", "expired", "on-hold", "canceled" में से एक },
Products
Products को आपके network से 1 या अधिक product ID वाली array के रूप में दिया जाता है। ध्यान दें, यह endpoint products नहीं बनाता। product creation endpoint को बेहतर समझने के लिए Ultimate Multisite का documentation देखें।
"products" : [1,2],
Payment
Membership की तरह, हमें केवल status की आवश्यकता है।
"payment" { "status" : "string", // "pending", "completed", "refunded", "partially-refunded", "partially-paid", "failed", "canceled" में से एक },
Site
और body को पूरा करने के लिए हमें site का URL और Title चाहिए, दोनों Site object के अंदर।
"site" : { "site_url" : "string", "site_title" : "string" }
register endpoint का return नई बनाई गई membership जानकारी के साथ एक array होगा।
Zapier में action बनाना
इस नए और अधिक मजबूत account creation endpoint के साथ आपको Zapier में एक नया action भी मिलेगा।
क्या आप जानते हैं कि Zapier के नए version की सभी सुविधाओं का उपयोग कैसे करें? यहां और जानें। (link?)
Action बनाना
Zapier के साथ registration endpoint का उपयोग कैसे करें, इसे बेहतर समझाने के लिए, आइए Google Forms के साथ एक integration बनाएं। हर बार जब यह form भरा जाएगा और जानकारी form की answer sheet में save होगी, Ultimate Multisite network में एक नई membership बनाई जाएगी।
Google Forms में, network में नई membership बनाने के लिए आवश्यक न्यूनतम fields के साथ एक form बनाएं।
अब Zapier में, एक नया Zap बनाएं और बनाए गए form को Google के माध्यम से उस spreadsheet से connect करें जहां data save होता है।
हो गया! Google Forms form Zapier से connect हो गया है और network के साथ integrate होने के लिए तैयार है। अब उस Action पर चलते हैं जो Google Forms द्वारा हर बार भरे �जाने पर trigger होने वाले Trigger का परिणाम होगा।
नया Ultimate Multisite app खोजें और उसे select करें। इस तरह के Zap के लिए Register option चुनें।
इस पहले step के बाद, वह account चुनें जो इस Zap से connect होगा।
यह पूरी प्रक्रिया का सबसे महत्वपूर्ण हिस्सा है। हमें Google Forms से आने वाले fields को register endpoint के लिए आवश्यक न्यूनतम fields के साथ match करना होगा, जैसा कि इस article के पिछले section में दिखाया गया है।
इस example में, हमें केवल username, email, password, name और website का URL configure करना है। बाकी पहले से निर्धारित रखा गया है ताकि इस Google Forms पर generate होने वाली सभी memberships समान product और status pattern का पालन करें।
जानकारी set up होने के बाद, final test पर आगे बढ़ें। अंतिम screen पर आप उन सभी fields को देख सकते हैं जो endpoint को भेजे जाएंगे, उनकी संबंधित जानकारी और वे fields जो empty भेजे जाएंगे।
अपने नए Zap का test करें और यह successfully complete होना चाहिए। यदि कोई error होती है, तो सभी fields check करें और देखें कि वे सही ढंग से भेजे जा रहे हैं या नहीं। चूंकि बहुत स�ारी जानकारी है, कुछ चीजें नजर से छूट सकती हैं।
Complete endpoint parameters
यहां complete call और सभी fields की संभावनाएं हैं जो भेजी जा सकती हैं।
"customer_id" : integer, "customer" : { "user_id" : integer "username" : "string", "password" : "string", "email" : "string", }, "membership" : { "status" : "string", // "pending", "active", "trialing", "expired", "on-hold", "cancelled" में से एक "date_expiration" : "string", "date_trial_end" : "string", "date_activated" : "string", "date_renewed" : "string", "date_cancellation" : "string", "date_payment_plan_completed": "string", }, "products" : [1,2], "duration" : "string", "duration_unit" : "string", "discount_code" : "string", "auto_renew" : "boolean", "country" : "string", "currency" : "string", "payment" { "status" : "string", // "pending", "completed", "refunded", "partially-refunded", "partially-paid", "failed", "cancelled" में से एक }, "payment_method" : { "gateway" : "string", "gateway_customer_id" : "string", "gateway_subscription_id" : "string", "gateway_payment_id" : "string", }, "site" : { "site_url" : "string", "site_title" : "string", "publish" : "boolean", "template_id" : "string", }